 |
All printers to be used in printing of reports must be defined in this option, as well as their printer instructions and possible Escape Sequences.
| Field | Type & Length |
Description |
|---|---|---|
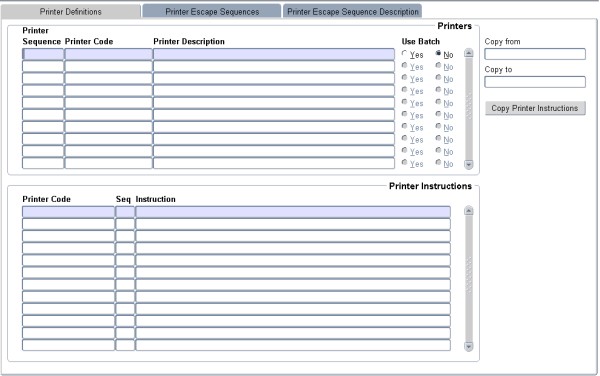
| Printer Sequence | N4 | The sequence in which the printers are to be displayed
for users, should be entered here. |
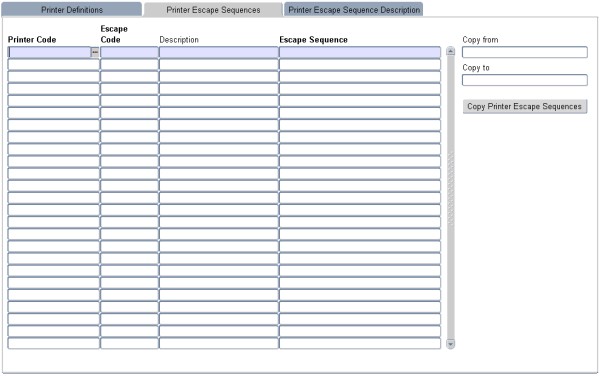
| Printer Code | A10 | PSEUDO name of this printer. The actual UNIX device
(without the "/dev/" part) may be used if preferred. |
| Printer Description | A40 | Enter the description to be displayed in the list of
available printers on the print menu. |
| Use Batch | A1 | The system will default to (N)o. Only printers set up as
batch printers
will be displayed when reports are generated. When starting a job in
the deferred batch module, the question "Do You Want To Select A
Printer For The Output At This Stage" will be asked. If a (Y)es is
replied, the queue builder will display only those printer names and
descriptions with a (Y)es entered here, and prompt for a printer
selection. The output files with the extension .pc, .sql, may be
printed to printers indicated as Batch 'Y'. A user may then select any
of the printers to which he/she is linked. |
| Printer Definitions: Printer Instructions | ||
| Printer Code | A10 | The PSEUDO printer name (as defined in Block 1 above). The <LIST> function will display all valid printer codes. |
| Seq | N2 | The sequence number of the print instruction, should more than one instruction be necessary. Printer instructions will be executed in the sequence defined here. |
| Instruction | A80 | This field may contain 80 characters although only 58
are displayed. It
must contain all the necessary commands to drive the printer (e.g. for
a printout on printer lp2, which is not the default system printer, the
instruction should be "lp -dlp2 $B"). NOTE: '$B' is a substitution parameter. Whenever '$B' is encountered within the printer instructions, the printer program will replace the parameter with the generated output file name. Other replacement parameters available are:
|
| Copy from | Specify the printer whose instructions you wish to copy. | |
| Copy to | Specify the printer code to which you want the instructions copied. | |
| Copy Printer Instructions | Copy the instructions. The procedure to do this is:
|
|
| Example 1 | ||
|
| Field | Type & Length |
Description |
|---|---|---|
| Printer Code | A10 | The PSEUDO printer name (as defined in Block 1 above).
The <LIST> function will display all valid printer codes.
|
| Escape Code | A5 | The Code for the Escape sequence. This is the user-defined name for this Escape, as defined on the 3rd TAB of this option. The <LIST> function will display all valid codes. |
| Escape Sequence | A80 | This field may contain 80 characters although only 64 are displayed. It must contain all the necessary escape sequences as per the printer manuals. The \nnn notation should be used where nnn = the decimal code. The system will be released with a basic code set for a HP LaserJet, and an Epson dot matrix printer inserted here. |
| Copy from | A10 | The PSEUDO printer name (as defined in Block 1) of which the codes are to be copied. |
| Copy to | A10 | The new Printer name to which the escape sequences are to be copied. |
| Copy Printer Escape Sequence |
|
| Field | Type & Length |
Description |
|---|---|---|
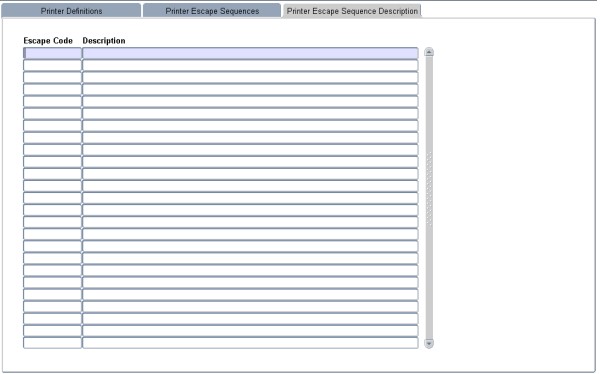
| Escape Code | A10 | The user Name of the Printer Escape. |
| Description | A5 | The Description for the Escape Sequence code. This is
the user-defined
description for this Escape Sequence. |
|
| Processing Rules |
|
|---|---|
| No special processing rules |
| Date | System Version | By Whom | Job | Description |
|---|---|---|---|---|
| 24-Mar-2007 | v01.0.0.0 | Amanda Nell | t134794 | New manual format. |
| 10-Mar-2008 | v01.0.0.0 | Vaughn Dumas | t134794 | System owner proof read. |