Operational Manual iComms
This is a new feature for
iComms. The
current situation required a user to set up features concerning the
type of output. This was a tedious process and ITS decided to code these
processes programmatically.
GENERAL
- Run the standard group just to make sure everything is working (this
saves time) ,
then
Create user defined group and always use/link
-DEFLTLOG
-DEFLTBL
-ILT01LST (Check the name of the program (in this case iltbea) , and use its
list
-ILT01LET (same as list, use the standard list just to make sure if the problem
is with
your letter or program), If the standard letter is not printing, you can report
the error to
the relevant team. If the standard letter is printing, the problem is with your
letter.
(This can be made inactive on the user's group once everything on the group is
perfect)
Letters
Bold
- Do not use bold tags next to a word that is not bolded (there won't be a
space between bolded and unbolded word)
e.g: You have met the requirements to be awarded a/the <QualFullName>
- If you bold a tag, make sure that the opening (<) and closing (>) of
the tag are also bolded (if not, the tag won't be recognised as a tag)
e.g: <QualFullName>
Images
-Make sure that all the images used in your letter are saved as PNG
Previously upon creating the master group, a user had to fill in the
following:
Summary of Style Sheet Usage / Set Up: this took place on
GMNT-5 and still does for some of the features. The features in Bold are to be used in GMNT-14.
| |
Letter |
Paragraph |
Label |
ACSII |
SMS |
List |
Log |
Group |
| Save As and upload
document as type |
*.rtf |
*.rtf |
*.rtf |
*.txt |
*.txt |
*.xsl |
*.xsl |
*.xsl |
| Output Format |
RTF |
RFT |
RTF |
RTF |
RDF |
PDF |
PDF |
MASTER |
| Output Type |
INC |
PINC |
INC |
INC |
SMS |
REP |
REP |
COMBIN |
| Mime Type |
(B1) |
text/rtf |
text/rtf |
text/rtf |
text/plain |
text/plain |
text/plain |
text/plain |
| Convert Document after
Upload |
Yes |
Yes |
Yes |
Yes |
Yes |
No |
No |
No |
The following information is capture on {GMNT-5}, TAB - Document Groups: the features in Bold are captured on GMNT-14.
| |
Letter |
Paragraph |
Label |
ACSII |
SMS |
List |
GENXML |
Log |
Group |
| Individual or Batch Level |
I |
** |
B |
B |
I |
B |
B |
B |
** |
| Display at Runtime |
No |
** |
Yes |
Yes |
No |
Yes |
Yes |
Yes |
** |
| Mime Type (B2) |
application/pdf |
** |
application/pdf |
text/plain |
text/plain |
application/pdf |
Application/xml |
application/pdf |
** |
| File Extension of end
result |
pdf |
** |
pdf |
csv |
txt |
pdf |
Xml |
pdf |
|
| Label |
No |
No |
Yes |
No |
No |
No |
No |
No |
** |
Now currently on ITS all the above takes place programmatically in the
background, thus a user will only enter the Document Classification
code and the system will generate all the above.
(Users cannot see or update this fields / data, that is being processed in the background).
Administration
1. Word Processor documents are stored as
RTF in ITS via {GMNT-14}
iComms Style Sheet.
2.
Each iComms option consists of a grouping of letter output formats.
These groups are stored in the "Document
Groups"
3. Tags to be used via the rtf -
documents are stored in the "Letter
Objects" - tab and must be matched with the
specified letter from
the "Document Groups"
- tab.
Please note that tags are small stylesheet extracts
that
define the format and XML tag name(s) to be displayed every
time
the tag is referenced.
After being uploaded to the ITS System, documents may
be merged with a specific set of data using the individual
iComms programs in the subsystems to generate final / merged
documents.
Demonstration #1
Purpose: The
creation of a Master Group.
GMNT-14 Block 1
a) Create the Master Group, a master group is required so that the user
can link the following features to it:
- Letter
- Label
- List
- ASCII
- Log File
In this demonstration ITS will produce all of the above
mentioned.
- The user will create an iComms code (Preferably with the
last three characters ending in GRP for Group) and a iComms
description, the user must also take into account that no spaces are
allowed in the description field as this description is often utilised
as a tag.
- The user will then select a Document Classification for
this Master by either utilizing the LOV and the selection of choice for
this would be MST =
Master.
Explanation: Taking place
in the background of the above mentioned process. When the
user selects a Document Classification, the system will ascertain the
aspects involved (The
output Format, Output Type and the Mime Type that is now defined by
ITS ), and populate this in the background. (Users
cannot see or update this fields / data.)
This is the stylesheet
that will be linked against the specific program in {USERS-1b4}.
Points: Please make sure that "Show" is activated. Upon committing the
User will populate.
Image 1.

|
|
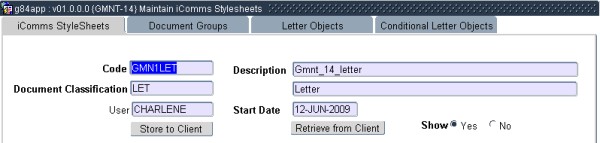
Demonstration #2
Purpose: The
creation of a Letter
- The
user will create an iComms code (Preferably with the last three
characters ending in LET for Letter ) and a iComms description. Same
rule applies. No spaces.
- The user will then select a Document Classification for
this Letter by
either utilizing the LOV and the selection of choice for this would be
LET = Letter.
- Same Background Explanation as above.
Image 2.
|
|
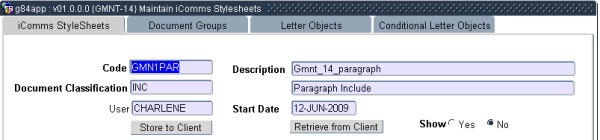
Demonstration
#3
Purpose: The
creation of a Paragraph
- The
user will create an iComms code (Preferably with the last three
characters ending in INC for Paragraph Include ) and a iComms
description. Same rule applies. No spaces. Note that the paragraph
defaults to "Show" = No. Keep it this way.
- The user will then select a Document Classification for
this Paragraph Include by
either utilizing the LOV and the selection of choice for this would be
INC =
Paragraph Include.
- Same Background Explanation as above.
Image 3.
|
|
Demonstration
#4
Purpose: The
creation of a Label
- The
user will create an iComms code (Preferably with the last three
characters ending in LAB for Label ) and a iComms
description. Same rule applies. No spaces.
- The user will then select a Document Classification for
this Paragraph Include by
either utilizing the LOV and the selection of choice for this would be
LAB = Label.
- Same Background Explanation as above
Image 4.

|
|
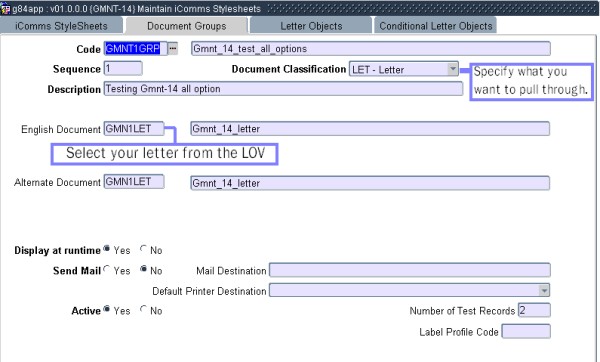
Demonstration
#5
Purpose:
Linking all the creations to the Master Group.
- Make sure that on the iComms Style Sheet Application the
user has accessed the Master Group. In other words, he/she must be
currently on the GMNT1GRP record.
- Select Tab - Document Groups.
- Enter the sequence.
- Enter the Document Classification, remember it must be
the same as on iComms Style sheet, in this case LET.
- Select from the LOV the English Document Code, the LOV
will list all codes created on iComms Style sheet Tab. Here it is
GMN1LET.
- Enter an alternate document, if one is not available a
user can enter the same document.
- Select Display at runtime, if this is not selected, the
Letter will not print.
Image 5.
|
|
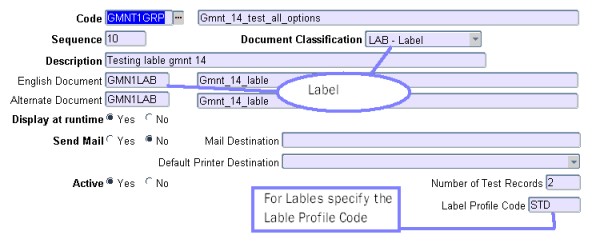
Link to the Master Group the Label.
NB: take note to the information on the images.
Image 6.
|
|
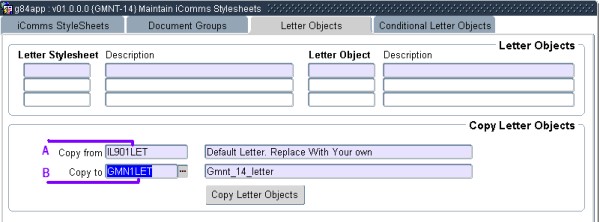
Demonstration
#11
Purpose: Copy letter object FROM the Default Letter to the Letter you created.
Image 7.
|
|
- On option "A" in the above image, the user must specify the
Default letter that he/she would like to obtain the objects from FOR
the letter.
- Note: That the letter has not yet been
designed in (Ms Word) the <tags> are necessary for this process
and this is the way to obtain them.
- On Option "B" in the above image, the user must specify his/her letter that was LINKED in the document groups.
- Now the user will generate the <tags> by pressing the "Copy Letter Objects".
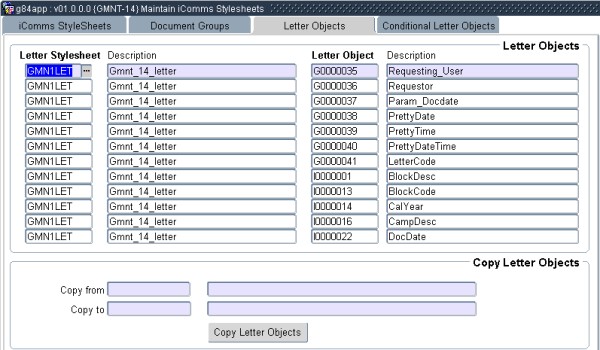
- This same procedure is to be executed with every feature mentioned:
- For Labels: Copy from a Default Label to your created label.
- For Lists: Copy from a Default List to your created list.
Image 8.
|
|
- In the above image the letter objects are now available for the design of the letter created in block 1.
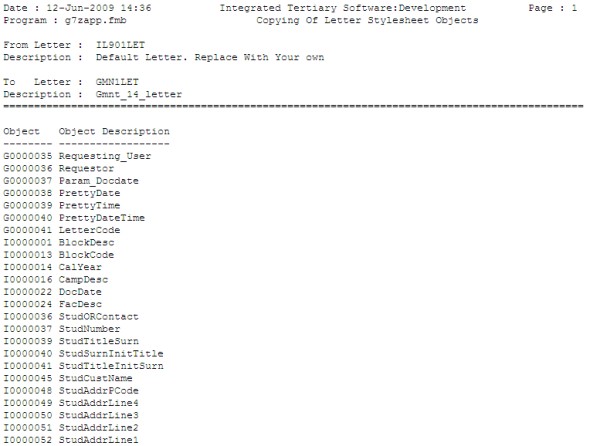
- In the image below is the report of the copying process.
Note: It
is a good idea to save this report or any of the generated tag reports
as a text file, and when designing ones letter, label or lists in word,
copy and paste the tags.
- Once the user has obtained the objects and the reports, they can proceed to designing the actual letter, label or list.
Image 9.
|
|
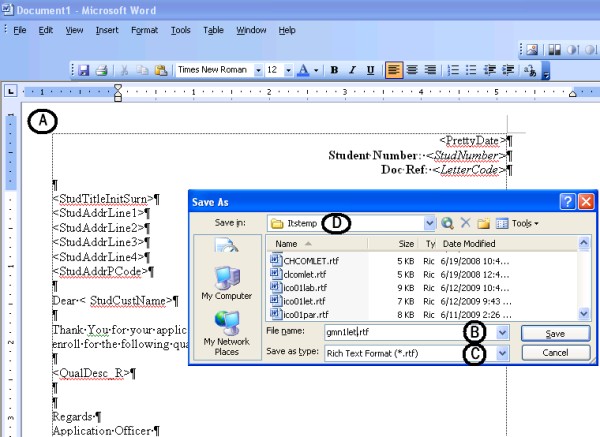
Demonstration
#6
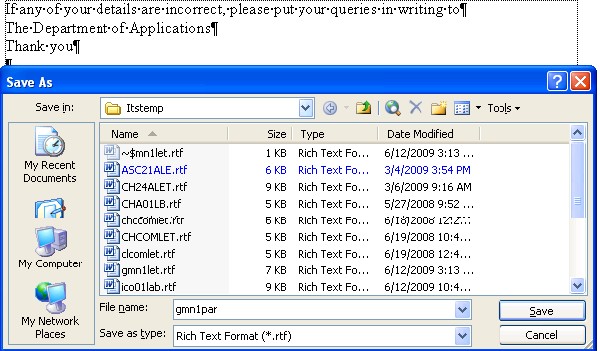
Purpose: Designing your created features in a Word Processor.
This demonstration will be using MS Word 2003.
- Open Ms Word, open the saved text file containing your tags.
- Copy and paste the tags you need and design your letter accordingly. ( See "A" on image a letter already designed)
- When completed, save this letter with its (See "C" on image for Save as type) being (rtf) and with the same name you created it on GMNT-14 block 1. In small caps, in this case (See "B" on image for Filename) gmn1let.rtf.
- Take note that when SAVING the user requires a directory named (See "D" on image for "itstemp") this is where the ITS system will be retrieving the letters and ect. from.
Image 10.
|
|
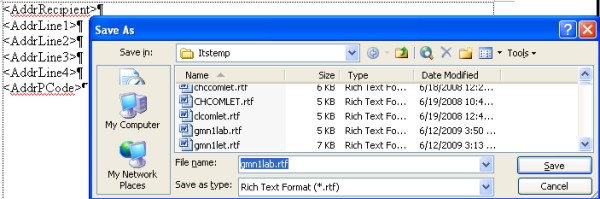
- The same procedure applies to paragraph design (Image below, a plain simple paragraph). It must be saved as a (rtf).
- Label are saved as (rtf).
Image 11.
|
|
The same procedure applies to labels design (Image below). It must be saved as a (rtf).
Image 12.
|
|
Once the user has created or designed the features in the word processor. He/she can now retrieve all these documents.
Demonstration
#7
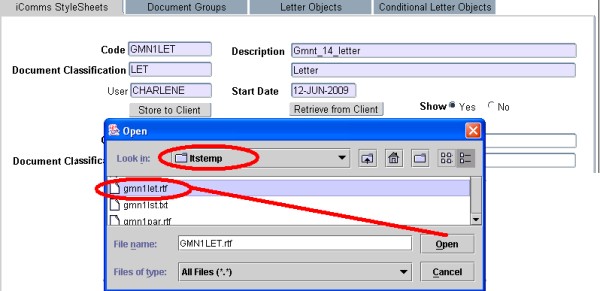
Purpose: "Retrieving from Client".
- GMNT-14: The user must go to his/her letter.
- Click on "Retrieve from Client", the user will now look under the
directory "itstemp" on the (C drive) for the letter they have created.
Image 13.
|
|
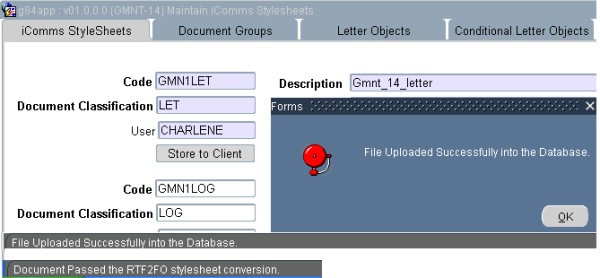
- Once the user has done this process, a message appears confirming
that the letter has been converted from "rich text format" to "forms
objects".
Image 14.
|
|
Demonstration
#8
Purpose: "Linking the group to a menu option".
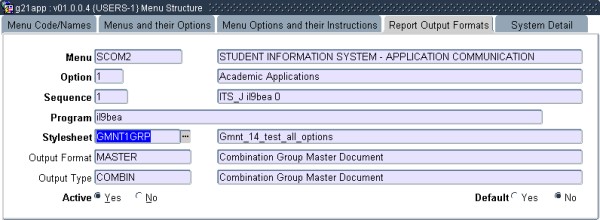
- The user will now proceed to USERS-1.
- Query the menu that he/she wishes to link the group to (in this example: SCOM2-1):
- Proceed to block 4 "Report Output Formats"
- Link as follows:
- Note that the program will default, this remains as is.
- On Style sheet the user will use the LOV and look for the Group he/she created.
- Make sure that "Active is selected.
- Commit.
Image 15.
|
|
Demonstration #12
Purpose: "Generating one output file for Letters"
- The user can now go to {BATCH-7}
- Query function 'COMPDF'
- Enter the path the output should be stored.
- All iComms programs will now create one file with all the Letters in it for printing in bulk.
Demonstration
#9
Purpose: "Printing the out put".
- The user can now go the required menu option (SCOM2-1);
- Enter in valid parameters.
- And on the right hand bottom side "Format" change this to his/her new Group. (GMNT1GRP).
- The images below are the outcomes of the features created above.
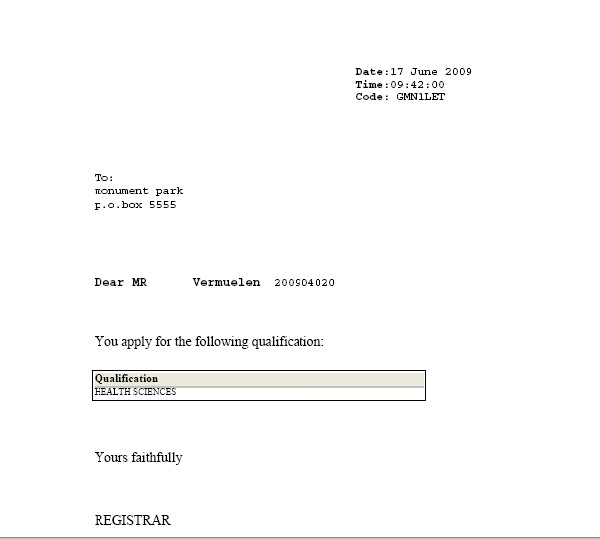
Letter Output
Image 16.
|
|
Label Output
Image 17.

|
|
Demonstration
#10
Purpose: "Inserting a Paragraph into a existing Letter".
- On Gmnt-14: Query your letter.
- Proceed to block 3: Letter objects and query your letter.
- Proceed to the last entry and insert a new line consisting on your paragraph.
- Commit.
Image 18.

|
|
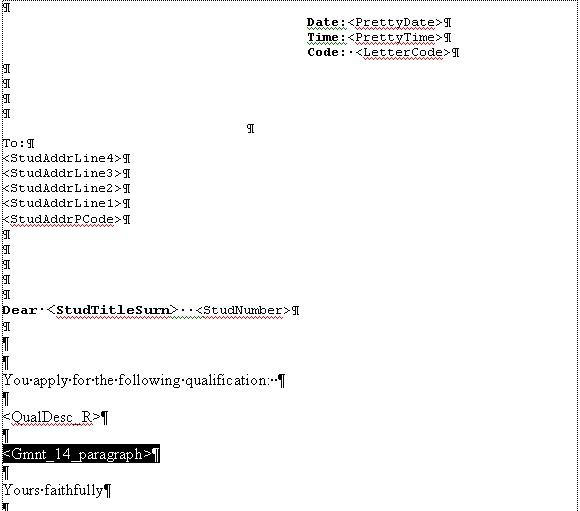
- Open your Word processor, open the letter you created.
- Insert in your letter the new tag that was created: in this case (Gmnt_14_paragraph).
- Save the letter as before.
- Go back to GMNT-14 and perform the "Retrieve from Client" step again.
- Go to SCOM2-1 and run the group again.
- Conditional texts are created in the same way that paragraphs are created. Each conditional text will have its individual tag.
Image 19.
|
|
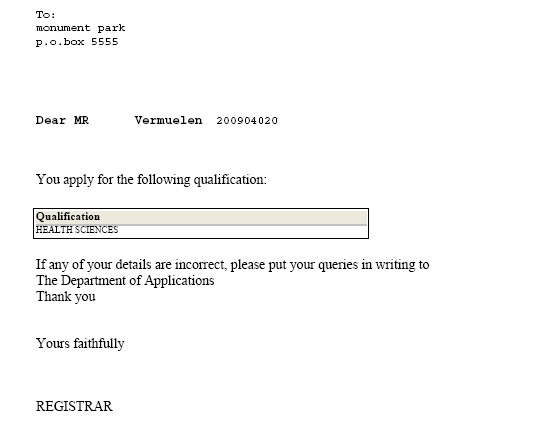
Letter with Paragraph include out put.
Image 20.
|
|
Processing
Rules |
|
| |
No special processing rules |
See Also:
History Of Changes
| Date |
System Version |
By Whom |
Job |
Description |
| 10-JUN-2009 |
v01.0.0.0 |
Charlene van der Schyff |
T159370 |
New manual format. |
| 17-FEB-2011 |
v02.0.0.0 |
Bea Swart |
T170840 |
Demonstration #12 Purpose: "Generating one output file for Letters" |
| 11-APR-2013 |
v02.0.0.1 |
Donald Lamola |
T189986 |
Update the manual : Add subheading descriptions |
| 29-Apr-2013 |
v02.0.0.1 |
Dinong Sereko |
T189986 |
System owner proof read |
| 18-Oct-2015 |
v03.0.0.0 |
Charlene van der Schyff |
t205119 |
Inserted links to other operational manuals |