Notes Operational Manual
This feature will allow the system
administrator to set-up a "notes facility"
for any program so that end users can enter and access notes
associated with any record accessed by the program.
The following note options are available to the user, to access notes
right click anywhere on a canvas.
- Notes
- Query Notes
- Personal Notes
Before user can make
use of Notes, Query Notes and Personal Notes, the following
administration must be in place.
- Step 1
Define set of code structures {GCS2-8}
- Step 2
Grant Access to users to use notes and set up restrictions.
{SMNT-5}
- Step 3
Create Notes, personal Notes and Query Notes (Right
Click)
Activities within each
Step
Creating
Notes
Step 1: Note Categories
The Note Categories will
represent the different areas within the ITS Back Office
System.
Category Codes starting
with a "Z" are a system generated code, and my not be deleted.
User can not create a code
starting with a "Z" neither.
When a
restriction/exception code needs to be linked to a user for notes a
specific
Note Category Code.
The category codes linked
to the
System Indicator matching the parameter "Maintain User
Restriction" option is called with, only these will be listed in the
LOV for the user.
The note category 'ZPDN'
is a ITS
defined category called Public Domain Notes and cannot be restricted.
This category must specifically be used when notes are created that
must print on the Student Debtor statements and Accounts Receivable
Debtor statements. Only notes linked to this category will print on
statements.
Example(s):
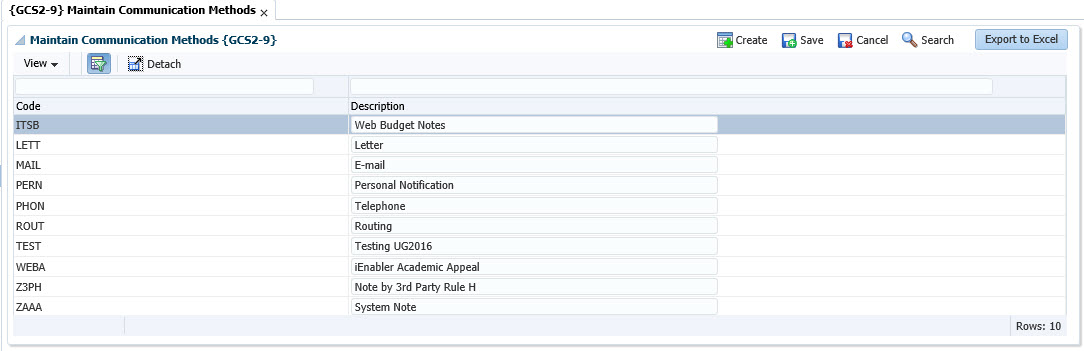
Step 2: Maintain Communication Methods
Communication Method will represent the different methods to
communicate a noted action that must take place.
For Example:
- eMail
- Letter
- Telephonically
Methods starting with "Z" may not be deleted or updated for they are
system generated methods.
a User can not create a code starting with "Z".
Example(s):
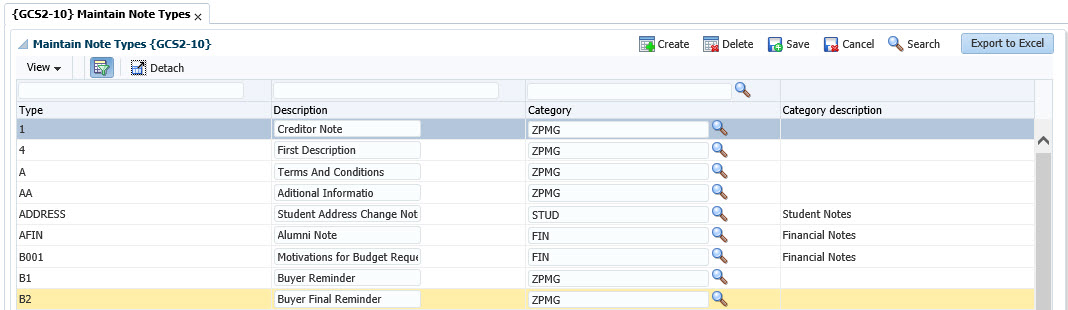
Step 3: Note
Types
In this option the user will create different Note Types and link them
to the correct Note Category Code.
Thru this connection the user can create different types/topics of
notes for a specific system area (Note Category).
Example(s):
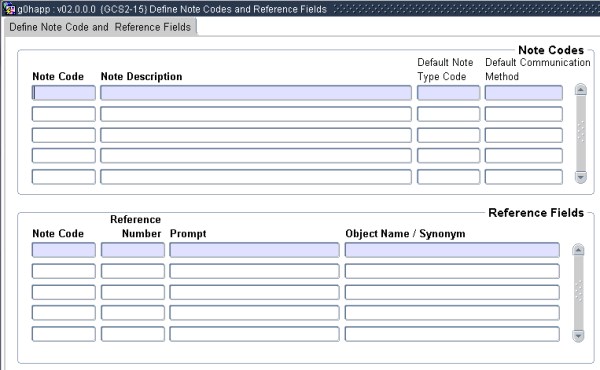
Step 4: Define
Note codes and Reference Fields
This option allow a user to define a specific 'key' as to how records
will be extracted.
In the first block the user defines an unique code to identify the
'key'.
Please note that codes starting with 'ITS' are system generated codes
and may not be updated or removed.
User can also not create a code starting with 'ITS'
In the second block the user must define at least one prompt for this
Note Code.
The LOV on the 'Prompt' field will help the user to select the correct
Object/Synonym
Example(s):
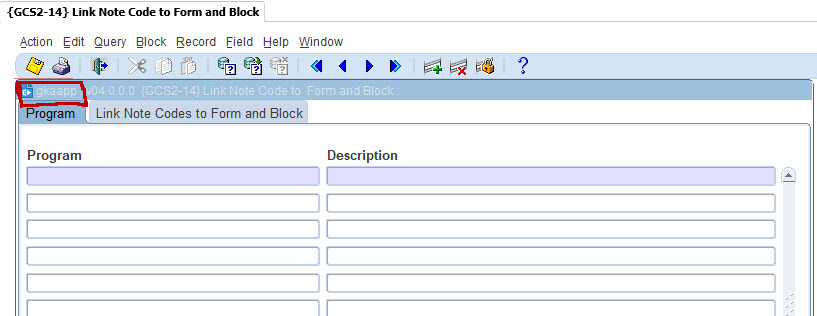
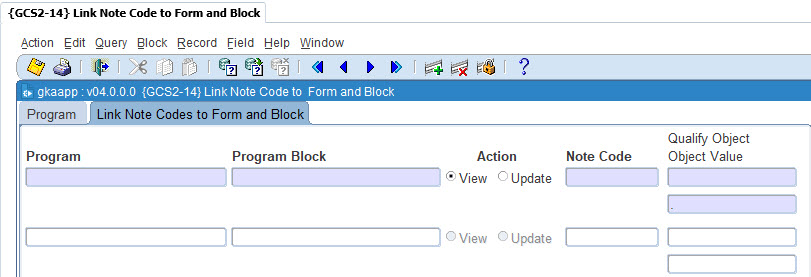
Step 5: Link Note Code to Form and Block
In this two block option the user will link all the Note Codes to a
selected form and block combination. Enabling the user to create notes
on a specific application (menu option) for one ore more different Note
Code (keys).
In block 1, the user must specify for which application (program) Note
Codes must be linked to.
There are two methods to use to determine the application (program)
name for the specific menu option you want to enable the note
functionality.
The first one is to get the program name from the top left corner of
the option you are in. For example to show how the user can
find the program: User is in on PBOP-1. On
screen print below the program name is ensorcelled in red
The second method is to make use of the LOV on the 'Program'
field. The information on the LOV will guide the user to
select
the correct program name. User can search on the menu name on
the
LOV:
Example(s):
Block 1 Program
From the previous screen we selected p01app.fmb as the program, you
will be able to link that program to certain blocks, see on the example
below how its linked.
You will also note on this block, the users whom will be able to view,
and those that will be able to update.
The View/Update Action button allow the user to define if any notes
linked to this Note Code are allowed to be Updated or may only be
Viewed. If the 'View' button is selected, the user will be
able
to view all the notes, but will be unable to Edit the existing note or
create a new note on this note code.
If the 'Update' button is selected, the user will be able to
view/update existing notes and create new notes on this note code.
Example(s):
Block 2 Link Note Code to Form and Block
Step 6: After
creating the following:
- Note Category
- Communication Methods
- Note Types
- Defined cote codes and reference fields
- Linked note codes to forms and blocks
We need access to these options, to see if you have access you can
query a student on SNAPPA-3 right click and the following should be
available.
- Notes
- Query Notes
- Personnel Notes, if not then you need access.
There are thee
restriction/exclusive codes for Notes.
User can manage the access and or restriction of Notes via the
following menu's for the different sub-systems:
| Menu |
Option |
System Code |
Description |
| CLCS |
21 |
l |
CLUB
SYSTEM |
| CMEM |
23 |
c |
MEAL
SYSTEM |
| CMNT |
4 |
g |
COMMITTEE
SYSTEM |
| FCSM |
4 |
f |
FINANCIAL
MANAGEMENT SYSTEMS |
| GCS |
11 |
g |
GENERAL
SYSTEM |
| HCS |
11 |
e |
HEALTH
SYSTEM |
| KMNT |
1 |
k |
CONTACT
MANAGEMENT SYSTEM |
| MISMNT |
2 |
m |
MANAGEMENT
INFORMATION SYSTEM |
| PAMT |
1 |
p |
PERSONNEL
SYSTEMS |
| SMNT |
5 |
i |
STUDENT
SYSTEMS |
| SPMNT |
3 |
s |
SPACE
INVENTORY SYSTEM |
| STMNT |
7 |
r |
SAPSE
REPORTS |
The same program, g2aapp.fmb are linked to all above menu's.
If a
sub system is not being catered for in above mentioned system's, the
user can not just link program g2aapp.fmb to a new menu. This
program works according to the "System Code" indicator as defined in
the Parameter field in the different menu instructions. The
different Access/Restriction/Exclusive codes are ITS defined and are
linked to the correct system code. a User can not alter these
codes or link them to other system codes. The three Note
restriction/access/exclusive codes are %NTC, %NTS and %NTE.
The
"%" in front of the codes will be replaced by the System Code as per
defined table above. Just take note that the Student codes
are
SMNT, SNTC and SNTE and for the Space Inventory System IMNT, INTC and
INTE.
The note category 'ZPDN' is a ITS category called Public Domain Notes
and cannot be restricted. This category must specifically be used when
notes are created that must print on the Student Debtor and Account
Receivable Debtor Statements. Only notes linked to this category will
print on statements.
Example(s):
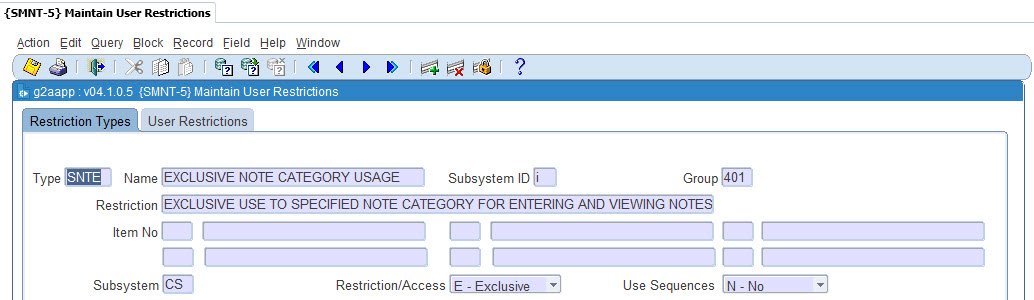
User Restrictions - SNTE
An Exclusive access to a Note Category can be linked to a user if the
use of that Note Category is for his/her exclusive use. Once
a Note
Category is linked to code %NTE, no other user can be restricted to
that Category via %NTC. Another user may only be linked to
that
Category in Exclusive mode.
This code allows users to access and view notes.
Example(s):
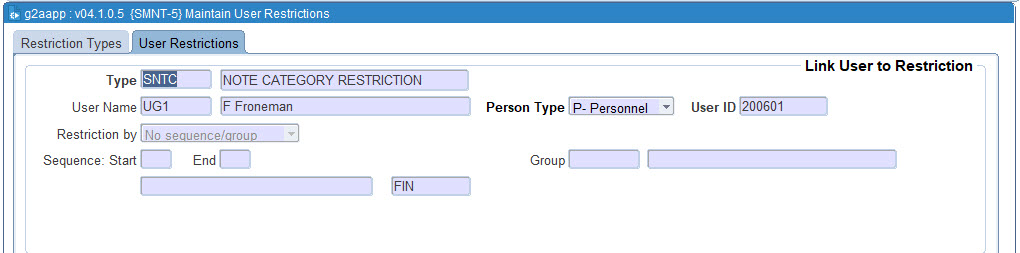
User Restrictions - SNTC
Because all users,
that are not restricted via restriction code %NTS to use notes, have
access to all notes, users can be restricted to certain Note Categories
only. This can be done by linking the user to restriction
code %NTC
and the specific Note category he/she is restricted to. Once
a user is
linked to a Note Category via %NTC, he/she can make only use of these
Note Categories.
Example(s):
User Restrictions - SNTS
All users has by default
access to Notes , Query Notes and Personal Notes. If for some
reason a
user may not make use of this functionality, the option exist to
restrict user by linking the user to Note restriction code
%NTS. This
exclude the use of Personal Notes.
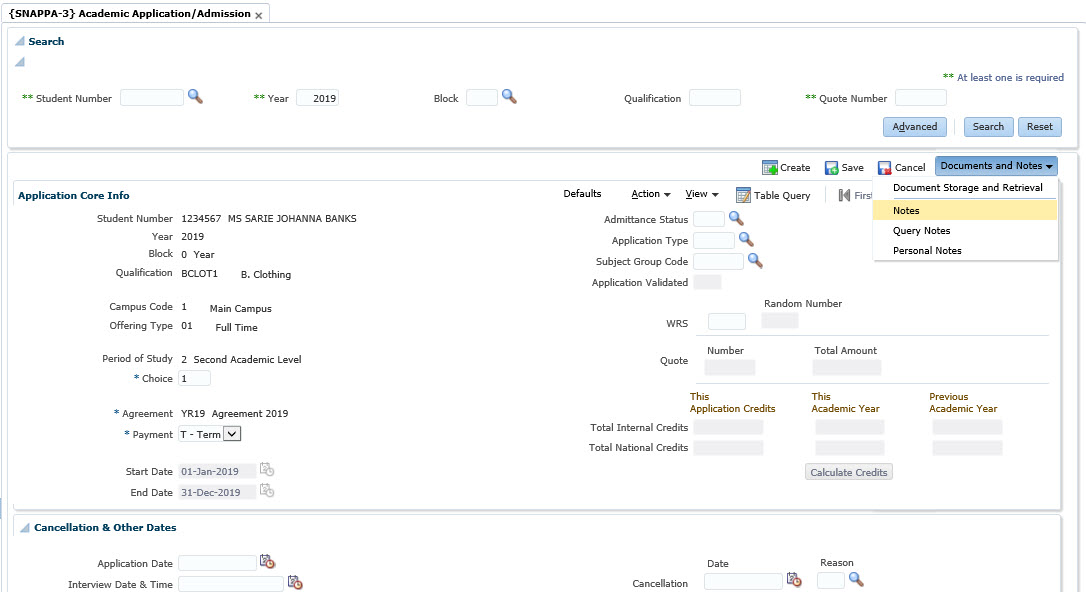
Creating a Note
Proceed to SNAPPA-3, query any student and right click,
As can be seen the options are available for:
- Notes
- Query Notes
- Personnel Notes
Select Notes:
Example(s):
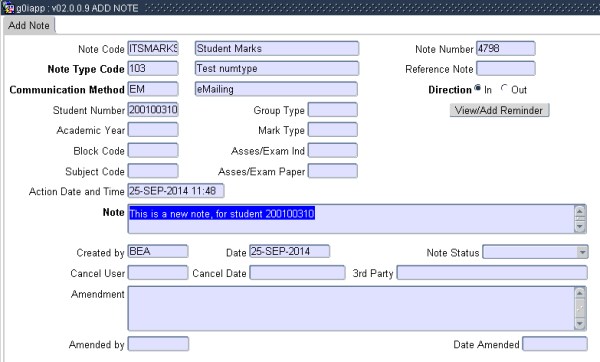
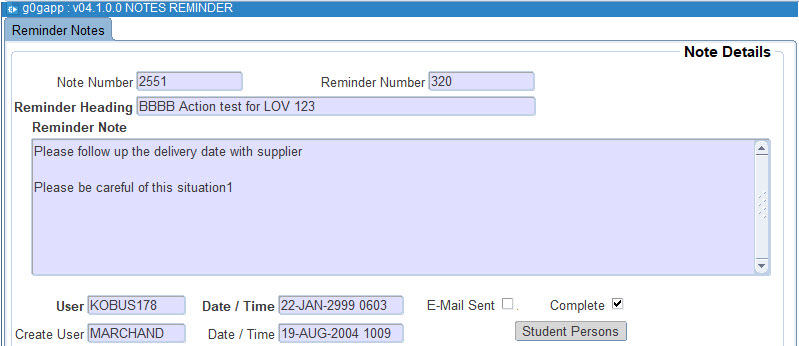
Creating a Note.
Select Notes: the Notes
Screen appears.
To add a note click on "Add Note" in the and the Notes Maintenance Screen will
appear. Remember that only Note Types linked
to this program will be available.
The LOV on Note Type Code will list all the Note Types for all the Note
Categories the user as access to. If user may only user Note Types
linked to Note Categories restricted to this user via %NTC, then only
those codes will be listed. If there are no restrictions, all
Note Types can be used.
Direction indicate if this notification was received in or out
bound.
Create a note in this screen and save. Once the user exit
this
option and return to the main note screen, a query will be performed
and the latest new note will be the first note on the list.
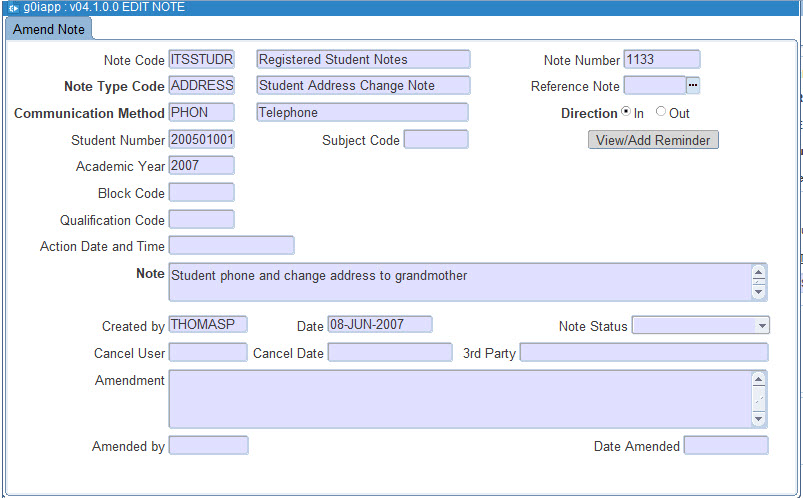
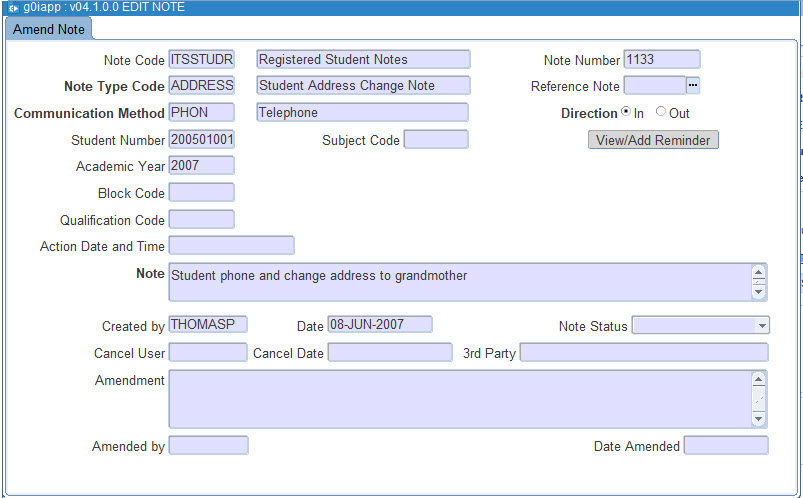
Editing a Note.
An existing note can be amended via the 'Edit Note' function.
Please take note that the original note will never be
updated.
The amendments will be saved by User name and the date the note was
changed.
As you can see the original note entry stays intact. The
amendment note is stored in another field.
If a user wants to cancel a note, change the Note Status to 'Cancelled'
When the user returns to the main Note screen, the amended note will
also be visible, as well as the user that did the change and the date
the amendment was done.
The
Student
Preferred Name/ Full Name and Surname will display on the first line
(This is ONLY for Notes from {GCS2-8} where System - I Student Systems)
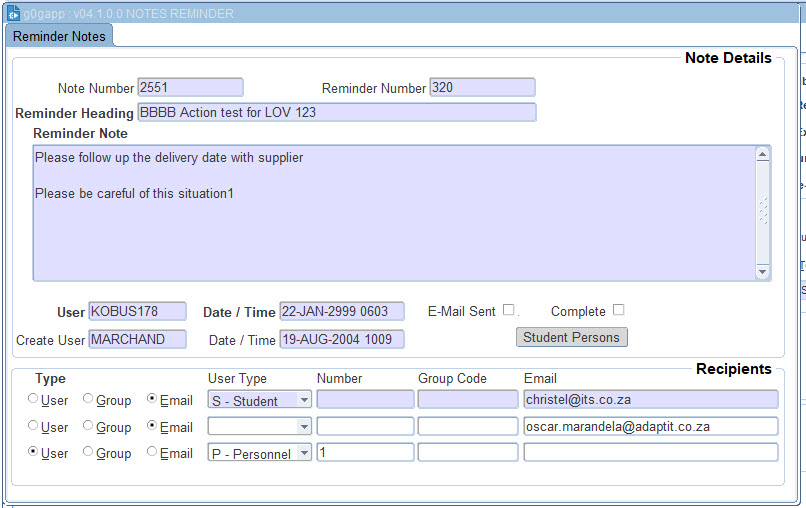
Note Reminder.
Functionality exist where by a user can send an e-mail reminder on a
specific note to a selected user, group or email outside of the
instituion.
- To create Groups for the email a user selects menu option {REQC-6}.
- To Link personnel to this group a user will select {GCS2-19}.
This can be done in the Notes
Reminders - screen by selecting the 'Reminder' button
The user can specify the reminder heading as well as a reminder
note.
The user to who is sending the mail. Selected from a LOV in
the 'User' field. The LOV will only list active in-service
personnel members.
Recipients:
Type
- User Select a specific user that the reminder
should be mailed to.
- Group Select group if there is more than one
personnel
member to receive this mail.
- Email Select email if you would like to send this
reminder
to an outside email address. (Other than the institution you are
working at).
The actual e-mail reminder will not be send on committing of the
reminder record. There are two ways that the user can handle
this:
Sending E-mail
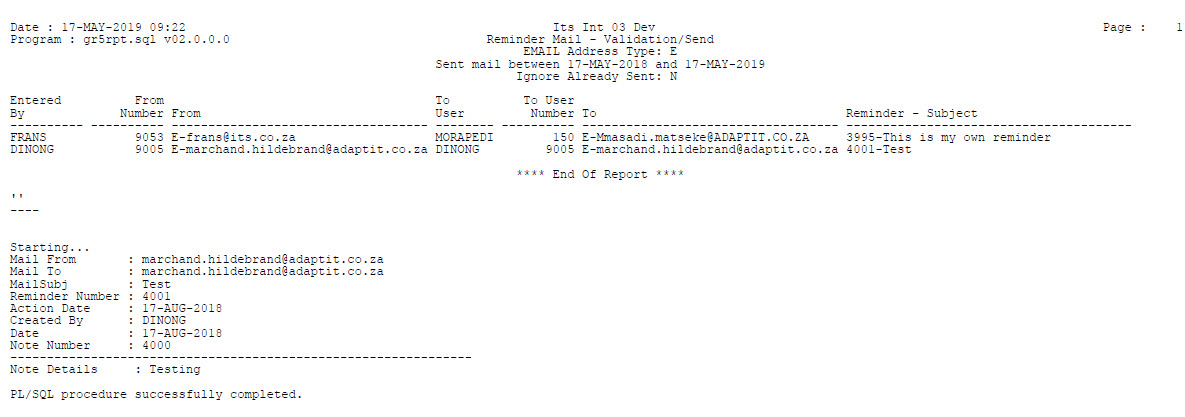
Manually {GOPS-23 : Send Notes Reminder Mail}
This is a report a user can run at any time to start the e-mailing
process for certain selection criteria.
The LOV on the E-mail address Type will list only Address Types where
the type is defined as a type e-mail. The mail will be send
to
this selected e-mail address, if this address is specified for the
personnel. If the mail address type do not exists for a
person,
the mail will not be send.
All mail where the Date/Time of the reminder fall between the 'From
Date' and 'To Date' will be selected.
If the user select Trail Mode = Yes, only a report will be produced to
list all the possible e-mail reminders that will be send, but the
actual mail will not be send.
On specifying the Trail Mode as No, a report will be produced and the
e-mail will be send.
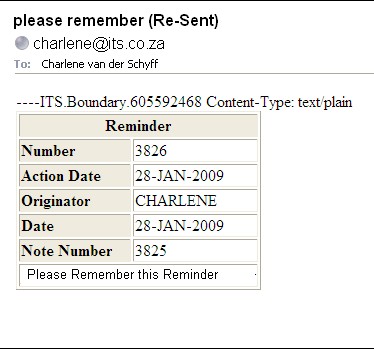
The user receives the following mail message.
The actual message will be:
Once the mail reminder was send to the selected user, the reminder note
will be marked as send:
Sending E-mail
Automatically {BATCH-9 : Background Processes}
This option
will send notes reminder e-mail ever x minutes automatically for a
specific date as specified by the user.
Go down to the 'gen.gr5pkg.Send_Reminder;' procedure. Specify
the 'Interval' in minutes when the mail must be send.
Change the 'Status' to Running.
This option will send all reminder notes for system date to the
selected users. It will automatically sent to the person's
primary active e-mail address.
Once the mail was successfully sent , the reminder note will be marked
as per the above manual option.
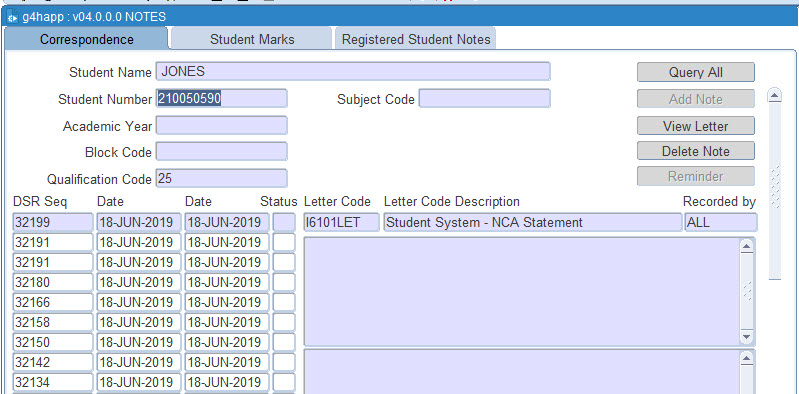
QUERY NOTES
One can query notes on any screen even the 'Integrator Entry Screen'
Just right click any where on the canvas and select 'Query Notes'
. Once again this will only be possible if a user is not
restricted to use notes via %SNTS.
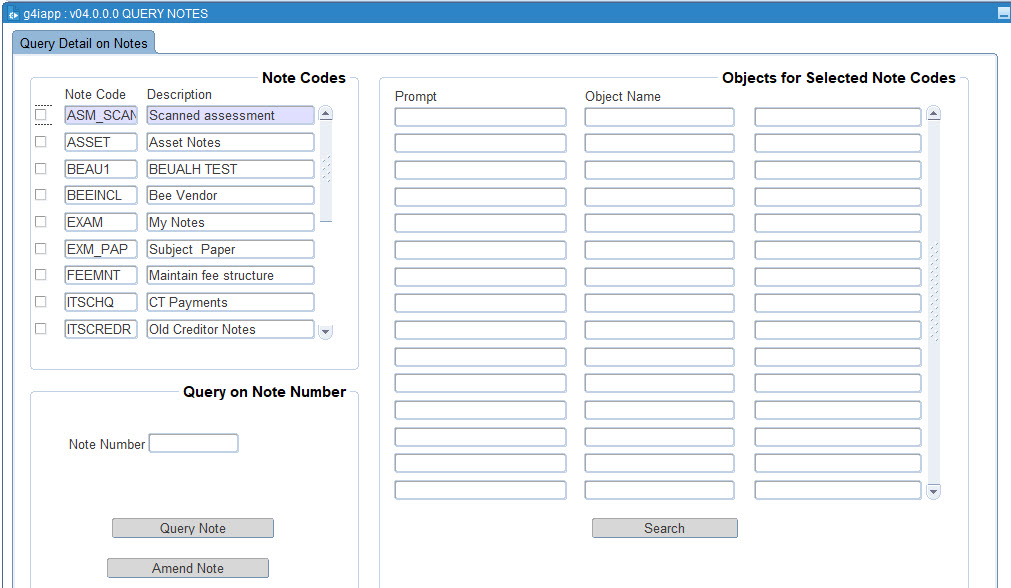
The following screen will appear:
Example:
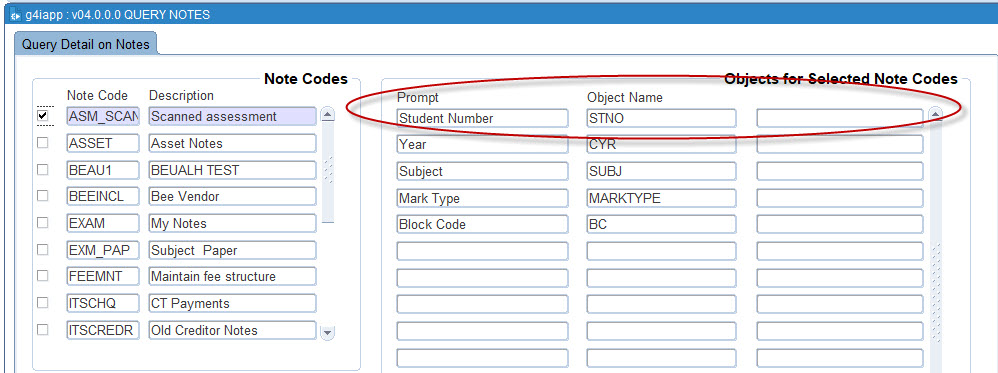
Mark the Note Code you want to query on in the top left block, Note
Codes.
User has two option to query.
Click 'Search' under the 'Objects for Selected Note Codes' block:
Example:
The prompts are the reference fields linked to the clicked Note Code as
defined on GCS2-15B2. The Student
Preferred Name/ Full Name and Surname will display on the first line
(This
is ONLY for Notes from {GCS2-8} where System - I Student Systems)
On selecting the 'Search' button the user will be navigated to the main
notes screen:
Example:
The user can also specify a value for the prompt and search, in this
case, for a note on a specific student number. Number
210050670.
Only notes for that specific student will then be queried:
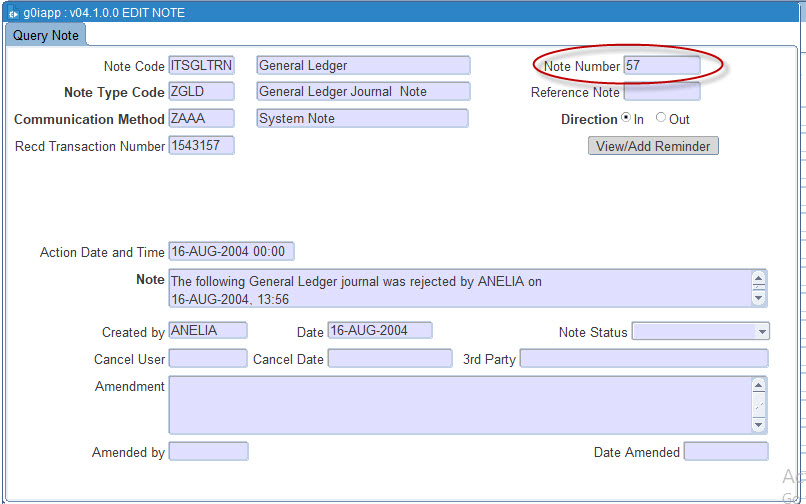
The other method is to make use of the 'Query on Note Number'. This
allow a user to query on a specific note number.
A LOV will list all existing notes and their auto generated
note numbers.
Example:
By pressing the 'Query Note' button, the actual not will be
displayed. Note that this is a query only and the user are
note allowed to amend the note.
Example:
Personal Notes
The functionality to create personal notes also exists for all users.
There are no restrictions on Personal Notes.
The difference between Personal Notes and other notes is that
the actual note is stored against the USER and not against an entity as
defined on the Note Code Reference Fields.
All the same functionalities exists for Personal Notes as for other
Notes. Add, Edit and create Reminder Notes are allowed on a
Personal Note.
Processing
Rules |
|
| |
No special processing rules |
See Also:
History Of Changes
| Date |
System Version |
By Whom |
Job |
Description |
| 11-Jan-2007 |
v01.0.0.0 |
Charlene van der Schyff |
t12345 |
New manual format. |
| 18-MAY-2007 |
v01.0.0.0 |
Melanie Zeelie |
f139024 |
Add restriction SNTE. |
| 07-Apr-2008 |
v01.0.0.0 |
Melanie Zeelie |
144697 |
Correct image - see 140950. |
| 05-Mar-2009 |
v01.0.0.0 |
Charlene van der Schyff |
t155786 |
Whilst training the consultants I noticed that the
screens
have changed tremendously and yet the manuals where not updated.
Updated the manual with
A) Added more detail to each option.
B) Inserted the correct images.
C) Added more detail to the restrictions.
D) Added further details concerning "Query Notes" and the "Notes
Reminder" |
| 05-May-2010 |
v02.0.0.0 |
Frans Pelser |
t161069 |
Add reference to the Note Reminders - screen |
| 20-Aug-2010 |
v02.0.0.1 |
Christel
van Staden |
t160866 |
New
note category 'ZPDN' |
| 26-Mar-2013 |
v02.0.0.2 |
Bea
Swart |
t187336 |
Student
Name and Surname display on Notes, ONLY for Student System |
03-Jun-2019
|
v03.0.0.0
|
Ndivhanga Mushando
|
t237380
|
Updating Manual
Images
|
| 20-Mar-2019 |
v04.1.0.0 |
Oscar Marandela |
T237380 |
Manual Proof reading |