Finance iEnabler {P00000-3}  


GENERAL

This is the manual for the Technical use and Installation, as well as the Maintenance of the ITS Finance iEnabler.  It is one of a series of user and technical manuals that is available for the ITS Systems. The Finance iEnabler has been developed to allow for:

Requisitions:
Goods Receiving:

General Ledger:
Budgeting

The reader is reminded that the copyright of the ITS systems and documentation remains with ITS Tertiary Software and that users thereof are contractually prohibited from providing information thereon to third parties, such as other educational institutions.

SYSTEM REQUIREMENTS
INSTALLATION

The installation will be done by ITS. The institution must provide ITS with a LOGO and Background Image for the Welcome page

WELCOME PAGE

An institution can decide on a LOGO and Background Image for the Welcome page. This page provides the user with Hypertext links, which the user will click on to move to the required page.
BUSINESS FUNCTIONS, PROCESSES and MAINTENANCE

The Finance iEnabler System is a dynamic system and is directly dependant on the set up of Business Functions and Processes as defined on the ITS Standard System {PWEBM-1, 2}.
All the rules of the Standard System have been incorporated, e.g. User Restrictions, Budget Control, Commitments etc.

Business Functions {PWEBM-1}

Instead of a menu structure as used in the ITS back-office system, iEnablers use business processes and functions from which to execute programs. After logging on into the iEnabler, a landing page is opened.  On the left hand side of the landing page the business process and function are displayed from which the user will start a business function. To display on the landing page, the business process and functions must be defined.
4
The business functions are defined in the option {PWEBM-1). This is done with an install script when the finance iEnabler is installed i.e. Finance iEnabler (PF0001), Requisitions (PR0001), General Ledger (PG0001).

Should the institution develop its own business process and functions, records need to be created to display in the business process in the iEnabler.  The user will first create the function/ processes in the option {PWEBM-1}.

Business Function Processes {PWEBM-2}

The user will first create the function / processes in {PWEBM-1} which will then be linked together to create a business process in this option. This is done with an install script when the finance iEnabler is installed. Should the user develop its own business process these records needs to be created in {PWEBM-1} and linked together in a process in {PWEBM-2}.
Business Function Codes And Description {USERS-1b2}

Each business functions used in the iEnabler is created in {USERS-1b1, 2 and 3}. This is done with an install script when the finance iEnabler is installed. Should the institution develop its own business process and functions, these records need to be created to display in the business process in the iEnabler.

e.g.
Block1
Menu Code PR001
Description Requisitions
Rel.Directory web
System WEB


Block2
Menu Code PR001
Sequence  1
Option 1
Test To Display  Maintain User Defaults

        
Access Function Definition {USERS-2}

Access to business functions can be restricted but it differs from the standard system in that the user either has access to an option or does not have access to an option. Update and select access does not apply in the iEnabler. With the install a generic access function WEBS is created. All iEnabler business functions are linked to this function with the install. Should the institution require users to be restricted to functions, the institution should create its own functions and link the required option to the functions and the function to the user. In block 1 the user will define an access function and in block 2 link business functions to the access function.
Link Users To Functions {USERS-3}

This option is used to link the access functions to Personnel, including iEnabler Systems, once the access functions are created in {USERS-2}.

INTEGRATION WITH OTHER SYSTEMS

A person defined as personnel {PBOP-1} and as a user on {USER-5} may gain access to the Finance Web. The personnel number and PIN number are needed to log in. A PIN may be created for all personnel by ITS on the install, to allow access to all personnel. A person with a reference number and PIN may obtain access by entering the reference number and PIN.

Requisition:
The subsystem Procurement Management (PM) must be operational.
The subsystem Counter System (CT) must be operational
The Routing System {GROU} should also be defined to generate email to different users during the requisition process.

The iEnabler User requesting items can be restricted with the restriction FPD or FPDR for the following combinations. {FCSM-4b2,3}.

Restricted to Departments only - the user may enter requisitions for all Cost Centres and Accounts of the restricted Department.

Restricted to Departments and Cost Centres only - the user may enter requisitions for all the Cost Centres to which the user is restricted and all the Accounts linked to the Cost Centre.

Restricted to Department Account Category Range - the user may enter requisitions for all the Cost Centres and only Accounts of the Departments the user is restricted to, where the accounts are linked to account categories in the range of account categories the user is restricted to.

Restricted to Departments Cost Centres and Account Category Ranges - the user may enter requisitions for all the Cost Centres and Accounts the user is restricted to, where the accounts are linked to account categories in the range of account categories the user is restricted to.

The iEnabler User overriding insufficient funds or approving items can be restricted with the restriction FA, FPA or FPAR for the following combinations. {FCSM-4b2,3}.

Restricted to Departments only - the user may override insufficient funds or approve requisitions for all Cost Centre and Accounts of the restricted Department.

Restricted to Departments and Cost Centres only - the user may override insufficient funds or approve for all the Cost Centres to which the user is restricted and all the Accounts linked to the Cost Centre.

Restricted to Department Account Category Range - the user may override insufficient funds or approve for all the Cost Centres and Accounts of the Departments the user is restricted to, where the accounts are linked to account categories in the range of account categories the user is restricted to.

Restricted to Departments Cost Centres and Account Category Ranges - the user may override insufficient funds or approve for all the Cost Centres and Accounts the user is restricted to, where the accounts are linked to account categories in the range of account categories the user is restricted to.


General Ledger:
The following subsystem must be operational: Financial Code Structure (CS) and General Ledger (GL).

The iEnabler User of the General Ledger can be restricted with the restriction FGLB for the following combinations. {FCSM-4b2,3}.

If the restriction FGLB is not linked to the user may see all Cost Centres and Accounts of the Institution.

Restricted to Departments only - the user can see all Cost Centres and Accounts of the Departments to which the the user is restricted.

Restricted to Department's Cost Centres - the user can see the Cost Centres and all the Accounts of the Cost Centres to which the the user is restricted.

Restricted to Department Account Category Range - the user can see all Cost Centres and only Accounts of the Departments where the accounts are linked to account categories in the range of account categories that the user is restricted to.

Restricted to Departments, Cost Centres and Account Category Ranges - the user can see the Cost Centres and only the Accounts of the Cost Centres that the user is restricted to where the accounts are linked to account categories in the range of account categories the user is restricted to.

The rules above may be flagged Inclusive or Exclusive.

Commitments from the Procurement Management Information System (PMIS), un-posted transactions from PMIS and Accounts Receivable (AR) will also be retrieved if they exist.

The iEnabler User of the General Ledger can be restricted on drill down to the transaction detail of a subsystem with the restriction FGLW.  If not restricted, the user may drill down on all sub systems, otherwise the user may only drill down on the subsystem the user is restricted to.
REQUSITION PROCESS
     The requisition process consists of the following six phases or statuses:

Processing - during this phase the requestor will enter requests for items to be issued from stores, purchase orders for goods and services or for cheques to be issued. To complete this phase of the process, the requestor will complete the request, which will start a document validation. If successful, the document's status will be changed. If cheques or purchase items are included in the document, the document's status will change to 'Verification'.  Completing this phase will start the routes FBUY and FCHQ.

Should the institution set the system operational definition code 'BH' "Allow Insufficient Funds" to 'N', the document will not change status unless the budget control indicator on all lines on the document is sufficient.

Verification    

Payment Validation - this phase allows the audit of payment requests. All payment requests must at least be 'Accepted' or 'Rejected'. During this phase the GLAs and cheque amounts of requested cheque items may be altered.

Buyer Function - the buyer function applies only to purchase order requested items. The required number of quotations must be entered for an item and the preferred supplier must be linked to the item. All purchase requests must at least be 'Accepted' or 'Rejected'.

To complete this phase of the process the requestor will complete the request, which will start a document validation. If successful the document will change status to 'Insufficient Funds' or 'First Approval'. Completing this phase will start the route FINS or FAP1 depending on the status to which the document changes.

Should the institution set the system operational definition code 'BH' "Allow Insufficient Funds" to 'N' the document will not change status unless the budget control indicator on all lines on the document is sufficient.

Insufficient Funds - should any line exist on a document where the Funds Indicator on the line indicates insufficient funds and all quotations have been entered, all items accepted or rejected and the document completed, the document will change status to "Insufficient Funds". A user with approval privileges (FCSM-5} must either "Force" or "Reject" the budget on the lines where fund are not sufficient.

Completing this phase will start the route FAP1 depending on the status to which the document changes.

First Approval - should any line exist on a document where the funds indicator on all lines are sufficient or forced, all quotation have been entered, all items accepted or rejected and the document completed the document will change status to " First Approval". A user with approval privileges (FCSM-5} must either "Approve " or "Reject" the document lines.

Completing this phase will start the route FAP2 depending on the status to which the document changes.

Second Approval - should all "Approval 1" fields for all lines on a document be approved or rejected, the funds indicator on all lines be set to sufficient, forced or rejected, all quotation have been entered, all items accepted or rejected, the document will change status to "Second Approval". A user with approval privileges (FCSM-5} who is not the first approval user must either "Approve" or "Reject" the document lines.
Completing this phase will start the route FREQ depending on the status to which the document changes.

Final /Normal - the requisition process is completed and the items is ready to be copied to an order, a cheque to be issued or a stock item to be issued.

NAVIGATION

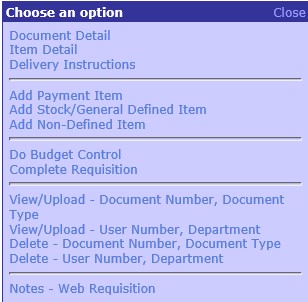
Should the user want to navigate to the available options on a function the user will click on the navigation link on the screen.Clicking on the navigation link will open the navigation menu from which the user will select the option to execute. From the navigation menu the user can select the "Add Stock/General Items", "Add Defined Items" or "Add Payment Items" to add items to the Requisition.
Should the user want to remove the navigation menu the user must move the cursor through the right hand corner of the navigation menu.

User can also navigate from a screen using the navigation link on the screen.


Example: Menu's available on the  navigation link

Example of ...


History of Changes


Date System Version By Whom Job Description
27-May-2009 v01.0.0.0 Marchand Hildebrand t156750 New manual format.
29-March-2011 v01.0.0.0 Precious Diale t163381 Create links for Goods Receiving