Introduction Financial Code
Structure
Subsystem {FRM-27}
- General Information
This is
the User Manual for
the
operation and maintenance of the ITS Financial Code
Structure
Subsystem. It
also describes Financial System Maintenance
Procedures.
It is one of a series of user and technical manuals that is available
for the ITS systems.
The reader is referred to
Section 3 for a global
overview of the ITS
Financial System and to
Section 4
for an overview of this Subsystem.
It is assumed that the reader is already familiar with the
general
operation of the menus, functions, keys and
the keyboard.
These
matters are fully discussed in User Manual: "Operational Aspects
of ITS Systems - Integrator 1. If a
drilldown is available on a field, a right click with the
mouse on a field with drilldown functionality, will invoke a pop-up
menu with a drilldown option. Selecting from the
pop up
menu will take the user directly to the relevant option. The normal
access restrictions apply.
The reader is referred to the following regarding field formats and
their use:
- Field Formats
- Numeric Fields
Numeric fields are
described, for
example, as N17.2 or N7. N17.2 means that there are 15 numeric
characters before the decimal point and two numeric characters after
the decimal point. The decimal point does not count as a
character. N7 means that there are a maximum of seven numeric
characters with no decimals.
- Alpha Fields
Alpha fields mean that
Alpha, numeric,
special characters or a combination thereof are permissible.
However, the following must be noted:
When requesting Start/Low/First values on reports, using a 0 (zero) or
multiple 0's (zeroes) does not mean that all data will be reported
on. The ASCII collation sequence is as follows:
Blank; Special characters (!, ", etc.); 0 (zero); 1 to 9; A to Z; a to
z; and then ~
Thus, for example, if a Blank (Space Bar) is used as the first
character and the start selection is '0' (zero), records beginning with
a Blank will not be reported on.
In order to prevent problems with the reporting on data, ensure that
the first character used in any field is a numeric or an
alpha.
Should any character other than an alpha or numeric be used as the
first character, it is done at your peril. In other words, do not
use a 'Blank' or 'Special Character' as the first character in alpha
fields.
The reader is reminded that the copyright
of the ITS systems and
documentation remains with ITS, and that users thereof are
contractually prohibited from providing information thereon to third
parties, such as other educational institutions.
- Overview of Financial
System
The ITS Financial
System consists of the following modules (Menu option in
brackets):
The modules are listed in sequence:
| 1 |
{FRM-1} |
Counter
Subsystem |
| 2 |
{FRM-2} |
Mail Recording |
| 3 |
{FRM-3} |
ACB System |
| 5 |
{FRM-5} |
Electronic Bank Conversion |
| 6 |
{FRM-6} |
E-Procurement B2B Vendors |
| 7 |
{FRM-7} |
Procurement Management (PMIS) |
| 21 |
{FRM-21} |
Student Accounts |
| 22 |
{FRM-22} |
Bursaries and Loans |
| 23 |
{FRM-23} |
Accounts Receivable |
| 24 |
{FRM-24} |
Debt Collection Interface |
| 27 |
{FRM-27} |
Code Structures |
| 28 |
{FRM-28} |
General Ledger |
| 29 |
{FRM-29} |
Income and Expense Budgeting |
All of these modules are fully integrated
with one another, and also with the other ITS Systems such as
Personnel, Student Information and Asset Inventory. More detail on the
individual modules are found in the appropriate User Manuals.
A comprehensive
system of access control
applies to these modules (refer to Section of this manual for more
detail.)
- Overview of Code
Structure Subsystem
- The Financial Code Structures have been designed with two
primary aims in mind, namely:
- flexibility
in the accounting structure
to the extent that every institution can specify its own structure to
suit unique requirements
- incorporation
of the specific requirements of STATS Reporting in the
accounting structure. By keeping the rather
complex STATS aspects
at the high level of cost centre and account definition, the normal
users of the system need not concern themselves with this aspect,
whilst the STATS
Statements can be produced as standard reports from
the system.
- Each Allocation Account in the General Ledger consists of a
Cost
Centre part and an Account
part, and reporting or queries can focus on
either of the two. The two parts can be summarised as follows:
- Cost centres
represent the destination
of transactions or the "where"
of different types of costs, and as such
normal financial reporting like Trial Balances, Income and Revenue
Statements and Balance Sheets can be produced at this level. Cost
Centres can be
linked to Fund Groups,
Program Classification, CESM's
and Departments for STATS and management reporting
purposes. The
user can also define various
ways of consolidating Cost Centres, and
the number of levels is unlimited.
- Accounts
represent the type
of cost or revenue. When accounts are
created, the STATS reporting aspects must be specified as well, thus
ensuring that STATS reports may be produced with the minimum of
additional user involvement.
- Transaction Types,
with predetermined GL-Allocations, can be
created to speed up the processing of transactions.
Transactions
are handled in a consistent manner in all the financial modules, and all transactions
originating in other ITS modules are
posted to the
General Ledger.
- Budgeting
Module forms part of the ITS Financial System ({FRM}),
and provides various user-defined consolidated figures in respect of
both the current and previous years.
- If the Budgeting
Module is not available to your
institution,
budgeted amounts can be updated on the General Ledger as normal
journals. This type of journal will only refer to the "budget
field" and when orders are issued, commitments are controlled against
the availability of funds in the relevant GLA.
- Linking with other
ITS Systems
- The integration of the ITS systems results in the
interdependence
of systems. Since the Financial Code Structures form the
"financial backbone" of the ITS Systems, no Financial Systems can be
implemented before these structures are in place.
- The set-up
rules specified in this subsystem, such as the
financial year and cycle, retaining of balances and transactions and
the budget control rules, default to all other financial subsystems.
- Cost
Centres and Accounts are defined in this subsystem,
and GL-Allocations
are built up through combinations of Cost Centres and
Accounts. These are the only GL-Allocations allowed, and they
are
used by all ITS Systems i.e. Financial, Student Accounts, Personnel,
Assets and Library.
- All financial subsystems are driven by transaction types,
which
are specified here and declared valid for the applicable subsystem.
- All transactions
in other subsystems that affect the
General Ledger are
validated against the GL-Allocations in this
subsystem.
- Implementation
Sequence
- The creation of complete code structures for Faculties
and
Departments in the General Support System (via options {GCS-3} and
{GCS-4}) is the only
prerequisite for defining Cost Centres and
GL-Allocations.
- Thereafter, the following logical sequence of
implementation
events should follow, the relevant menu options being indicated in
braces:
| {FCSO-21} |
Maintain
Foreign Currencies |
| {GCS-1} |
Maintain
Own Currency
(Institution
Information) |
| {GOPS-6} |
Assign
User Names,
Passwords and Privileges |
| {FCSC-3} |
Maintain
Different
Ledgers |
| {FCSM-1} |
Define
System
Operation and Create Set-up Rules |
| {FCSM-2} |
Define
Subsystems |
| {FCSC-8} |
Maintain Budget Codes |
| {FCSM-7} |
Maintain Budget Ranges |
| {FCSC-7} |
Maintain
Account
Categories, defining those categories,
which are valid
for this subsystem (The
system is installed
with the standard
categories) |
| {FCSC-6} |
Maintain
Fund
Groups (The
system is installed with
the
standard fund groups) |
| {FCSC-1} |
Maintain
VAT Rates |
| {FCSC-2} |
Define
VAT
Registrations |
| {FCSM-3} |
Maintain
Auto
Generated Numbers |
| {FCSO-1} |
Maintain
Cost Centre Definition |
| {FCSO-2} |
Maintain
Cost Centre
Definition Structure |
| {FCSO-3} |
Maintain
Account Definitions |
| {FCSO-4} |
Validate
Account Structure |
| {FCSO-5} |
Maintain
Account Lists |
| {FCSO-6} |
Maintain
GL-Allocations |
| {FCSC-21} |
Maintain
Account Type
Definitions |
| {FCSC-4} |
Define
Banks (The system is installed with a list
of banks) |
| {FCSC-5} |
Define
Cash Book
Definition |
| {FCSM-4} |
Maintain
User Restrictions |
| {FCSM-5} |
Finance
User Access Control |
| {FCSM-6} |
Maintain
Cheque Authorisation |
| {FCSO-23} |
Maintain
Types of
Documents |
| {FCSO-7} |
Create
Transaction
Types and the Combination of
Transaction Types and Transaction Events. |
| {FCSC-22} |
Link Budget Control Account (Optional) |
{FCSP-7}
|
Maintain Functions and Group Functions |
{FCSP-6}
|
Maintain Rule Definitions
|
{FCSP-4}
|
Link Functions to Rules
|
{FCSP-3}
|
Maintain Action Groups and Users
|
{FCSP-5}
|
Link Users to Functions and Rules
|
- The GL Report Writer
A report design consists of two main elements namely
rows and
columns.
The
rows
will allow the user to group
accounts
together and specify a
group description.
The
columns
contain
cost centres and/or
consolidation cost centres, and
the user can specify a description for each of the columns.
The GL report writer extracts historic information for up to 9 years and
expense budget or budget information for the following 9 years.
Each report has its own notes. The note may have user defined tag's that will display a row and column amount in the note.
The GL Report Writer can select data from:
General Ledger Actuals
General Ledger Budgets
Commitments
Expense Budgets; Forecast, Requested and/or Approved
Calculate formulas per Row and/or Columns.
The
maximum
number of
rows
is
999 and
for
columns
it is
99.
To create this GL
report,
using the GL Report Writer Functions, the user will use the
following options
Code Structure for GL Report and iEnabler Executive Web
Code Structure for Note Information load as document classification of "INC"
Needed to report on Expense Budget
| {MEBM-1} |
Maintain System Parameters |
| {MEBO-1} |
Maintain Forecast Budget |
| {MEBO-3} |
Maintain Requested Budget |
| {MEBO-4} |
Maintain Approved Budget |
Output per hard/paper copy or for spreadsheet
Output for iEnabler Executive Web
- The Construction of the GL Report
1.
Create/Maintain the report Layout in a spreadsheet (Report layout
working paper)
2. Create/Maintain the Account lists for
each row.
3. Create/Maintain the Consolidation Cost
Centre if required
4. Create/Maintain the Report Body
Create the Report Code
Create/Maintain the Row Information
Link Rows to their Account List
Create/Maintain the Column Information
Create/Maintain the Note Information
Create/Maintain the Note Tag Information
Link Note Information to the Row information
5. Validate Report Data
6. Run the report
- Create/Maintain
the report Layout in a spreadsheet
We propose that you
should
start by
designing your report on a spreadsheet (Use paper or Excel, Lotus,
etc.).
After that you can use the spreadsheet information to create the
necessary code structure.
To design your report, open a new spreadsheet with columns and rows.
Spreadsheet Step 1: Row
Information
In Column A, start with the row information from the 10th row and type
all the descriptions of the rows.
You can create any number of blank
lines between rows if necessary.
Below is an example of a Revenue/Expense- and Balance Sheet report for
a consolidation cost centre with previous year information.
| |
A |
B |
C |
D |
E |
F |
| 1 |
|
|
|
|
|
|
| 2 |
|
|
|
|
|
|
| 3 |
|
|
|
|
|
|
| 4 |
|
|
|
|
|
|
| 5 |
|
|
|
|
|
|
| 6 |
|
|
|
|
|
|
| 7 |
|
|
|
|
|
|
| 8 |
|
|
|
|
|
|
| 9 |
|
|
|
|
|
|
| 10 |
TOTAL REVENUE AND
EXPENSE |
|
|
|
|
|
| 11 |
|
|
|
|
|
|
| 12 |
Total Income |
|
|
|
|
|
| 13 |
|
|
|
|
|
|
| 14 |
Government |
|
|
|
|
|
| 15 |
Private |
|
|
|
|
|
| 16 |
|
|
|
|
|
|
| 17 |
Total expense |
|
|
|
|
|
| 18 |
|
|
|
|
|
|
| 19 |
Salaries PC1 |
|
|
|
|
|
| 20 |
Salaries PC8 |
|
|
|
|
|
| 21 |
|
|
|
|
|
|
| 22 |
Total Salaries |
|
|
|
|
|
| 23 |
|
|
|
|
|
|
| 24 |
Stationary |
|
|
|
|
|
| 25 |
Travel |
|
|
|
|
|
| 26 |
Printing |
|
|
|
|
|
| 27 |
|
|
|
|
|
|
| 28 |
Total Supplies and Services |
|
|
|
|
|
| 29 |
|
|
|
|
|
|
| 30 |
|
|
|
|
|
|
| 31 |
BALANCE SHEET FOR THE
PERIOD |
|
|
|
|
|
| 32 |
|
|
|
|
|
|
| 33 |
Total
Funds |
|
|
|
|
|
| 34 |
|
|
|
|
|
|
| 35 |
Accumulated |
|
|
|
|
|
| 36 |
Revenue and
Expense |
|
|
|
|
|
| 37 |
|
|
|
|
|
|
| 38 |
Total
Asset |
|
|
|
|
|
| 39 |
|
|
|
|
|
|
| 40 |
Furniture |
|
|
|
|
|
| 41 |
Motor
Vehicles |
|
|
|
|
|
Spreadsheet Step 2: Row
Information Detail Account
In column C of each row
enter the detail account that will make up the
value of the row description.
Also describe the level
total. Column B is the note number column can be use with the
note information.
| |
A |
B |
C |
D |
E |
F |
| 1 |
|
|
|
|
|
|
| 2 |
|
|
|
|
|
|
| 3 |
|
|
|
|
|
|
| 4 |
|
|
|
|
|
|
| 5 |
|
|
|
|
|
|
| 6 |
|
|
|
|
|
|
| 7 |
|
|
|
|
|
|
| 8 |
|
|
|
|
|
|
| 9 |
|
|
|
|
|
|
| 10 |
TOTAL
REVENUE AND
EXPENSE |
|
Value
Row 12 and
17 |
#A |
|
|
| 11 |
|
|
|
|
|
|
| 12 |
Total
Income |
|
Value
Row 14 and 15 |
#A |
|
|
| 13 |
|
|
|
|
|
|
| 14 |
Government |
|
Acc 5001
5002, 5003 |
|
|
|
| 15 |
Private |
|
Acc
5100, 5101 |
|
|
|
| 16 |
|
|
|
|
|
|
| 17 |
Total
expense |
|
Value
Row 22 and
28 |
#A |
|
|
| 18 |
|
|
|
|
|
|
| 19 |
Salaries
PC1 |
|
Acc
0101, 0102, 0103,
0104 |
|
|
|
| 20 |
Salaries
PC8 |
|
Acc
0801,
0802 |
|
|
|
| 21 |
|
|
|
|
|
|
| 22 |
Total
Salaries |
|
Formula
R19+R20 |
#B |
|
|
| 23 |
|
|
|
|
|
|
| 24 |
Stationary |
|
Acc
3010,
3011 |
|
|
|
| 25 |
Travel |
|
Acc
3120 |
|
|
|
| 26 |
Printing |
|
Acc
3220, 3221,
3330 |
|
|
|
| 27 |
|
|
|
|
|
|
| 28 |
Total
Supplies and
Services |
|
Formula
R24+R25+R26 |
#B |
|
|
| 29 |
|
|
|
|
|
|
| 30 |
|
|
|
|
|
|
| 31 |
BALANCE
SHEET FOR THE
PERIOD |
|
|
|
|
|
| 32 |
|
|
|
|
|
|
| 33 |
Total
Funds |
|
Value
Line 35 and 36 |
#A |
|
|
| 34 |
|
|
|
|
|
|
| 35 |
Accumulated |
|
Acc
7010, 7020,
7030 |
|
|
|
| 36 |
Revenue
and
Expense |
|
Formula
R4 |
#B |
|
|
| 37 |
|
|
|
|
|
|
| 38 |
Total
Asset |
|
Value
line 40 and 41 |
#A |
|
|
| 39 |
|
|
|
|
|
|
| 40 |
Furniture |
|
Acc
8010, 8011, 8020,
8030 |
|
|
|
| 41 |
Motor
Vehicles |
|
Acc
8040 |
|
|
|
Vertical Calculations #A and #B:
#A: Is a UP calculation. User must use Account List to do the calculations.
#B: Is a DOWN calculation. User can us row formula or account list to do the calculations.
Above example use row formula calculations.
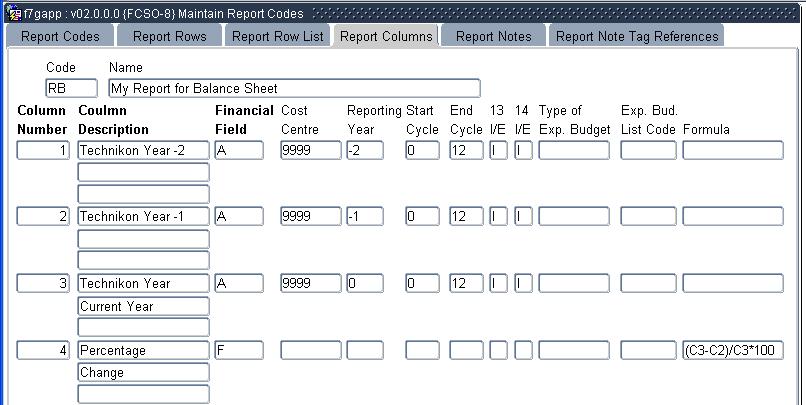
Spreadsheet Step 3: The
Column Information
From column C and columns
thereafter for rows 1, 2 and 3 specify the
following for each column:
Row
1 Heading
text or column description. Up to 3 description field can be used.
Row 2 Financial Field: Must be one of the
following: Actual. Budget, Commitment, Expense Budget or Formula .
Row
3
Cost Centre or Consolidation Cost Centre Code. Only one code per column
Row 4 Reporting Year.
Use values
0, -1, -2 up to -9 or 1, 2, up to 9. NB the report generator program will require the
user to
enter a year and this year will be used as the
value 0 year and
the rest will be the 0 year minus 1 or 2 etc.
Row 5 Start and End Cycle.
Row 6 Include/Exclude Cycles 13 and 14.
Row 7 Type Of Expense Budget: Forecast, Requested or Approved.
Row 8 Expense Budget List Code. This list Code has the Expense Budget Parameter Set/s to be used.
Row 9 Formula. Can do any arithmetic calculation on values is column smaller than the formula column.
| |
A |
B |
C |
D |
E |
F |
| 1 |
(Column
Description) |
|
Technikon
Year
-2 |
Technikon
Year
-1 |
Technikon
current year |
Percentage
Change |
| 2 |
(Financial Field) |
|
A |
A |
A |
F |
| 3 |
(Column Cost Centre/Consolidation) |
|
9999 |
9999 |
9999 |
|
| 4 |
(Column Reporting Year) |
|
-2 |
-1 |
0 |
|
| 5 |
(Start and End Cycle) |
|
0-12 |
0-12 |
0-12 |
|
| 6 |
(Include/Exclude Cycle 13 and 14) |
|
13In, 14In |
13In, 14In |
13In, 14In |
|
| 7 |
(Type of Expense Budget) |
|
|
|
|
|
| 8 |
(Expense Budget List Code) |
|
|
|
|
|
| 9 |
(Formula) |
|
|
|
|
(C3-C2)/C3*100 |
| 10 |
TOTAL
REVENUE AND
EXPENSE |
|
Value
Row 12 and
17 |
|
|
|
| 11 |
|
|
|
|
|
|
| 12 |
Total
Income |
|
Value
Row 14 and 15 |
|
|
|
| 13 |
|
|
|
|
|
|
| 14 |
Government |
|
Acc 5001
5002, 5003 |
|
|
|
| 15 |
Private |
|
Acc
5100, 5101 |
|
|
|
| 16 |
|
|
|
|
|
|
| 17 |
Total
expense |
|
Value
Row 22 and
28 |
|
|
|
| 18 |
|
|
|
|
|
|
| 19 |
Salaries
PC1 |
|
Acc
0101, 0102, 0103,
0104 |
|
|
|
| 20 |
Salaries
PC8 |
|
Acc
0801,
0802 |
|
|
|
| 21 |
|
|
|
|
|
|
| 22 |
Total
Salaries |
|
Formula
R19+R20 |
|
|
|
| 23 |
|
|
|
|
|
|
| 24 |
Stationary |
|
Acc
3010,
3011 |
|
|
|
| 25 |
Travel |
|
Acc
3120 |
|
|
|
| 26 |
Printing |
|
Acc
3220, 3221,
3330 |
|
|
|
| 27 |
|
|
|
|
|
|
| 28 |
Total
Supplies and
Services |
|
Formula
R24+R25+R26 |
|
|
|
| 29 |
|
|
|
|
|
|
| 30 |
|
|
|
|
|
|
| 31 |
BALANCE
SHEET FOR THE
PERIOD |
|
|
|
|
|
| 32 |
|
|
|
|
|
|
| 33 |
Total
Funds |
|
Value
Line 35 and 36 |
|
|
|
| 34 |
|
|
|
|
|
|
| 35 |
Accumulated |
|
Acc
7010, 7020,
7030 |
|
|
|
| 36 |
Revenue
and
Expense |
|
Formula
R4 |
|
|
|
| 37 |
|
|
|
|
|
|
| 38 |
Total
Asset |
|
Value
line 40 and 41 |
|
|
|
| 39 |
|
|
|
|
|
|
| 40 |
Furniture |
|
Acc
8010, 8011, 8020,
8030 |
|
|
|
| 41 |
Motor
Vehicles |
|
Acc
8040 |
|
|
|
Here is another example of
column information. The
institution
has 4 residences, each has its own cost centre OR
residence
consolidation cost centre that consolidate into cost centre
R999.
For only the first six months of the Year.
The column design will then look as follows:
| |
A |
B |
C |
D |
E |
F |
G |
| 1 |
(Column
Description) |
|
Residence
A |
Residence
B |
Residence
C |
Residence
D |
TOTAL |
| 2 |
(Financial Field) |
|
A |
A |
A |
A |
A |
| 3 |
(Column Cost Centre/Consolidation) |
|
R100 |
R200 |
R300 |
R400 |
R999 |
| 4 |
(Column Reporting Year) |
|
0 |
0 |
0 |
0 |
0 |
| 5 |
(Start and End Cycle) |
|
0-6 |
0-6 |
0-6 |
0-6 |
0-6 |
| 6 |
(Include/Exclude Cycle 13 and 14) |
|
13Ex, 14In |
13Ex, 14In |
13Ex, 14In |
13Ex, 14In |
13Ex, 14In |
| 7 |
(Type of Expense Budget) |
|
|
|
|
|
|
| 8 |
(Expense Budget List Code) |
|
|
|
|
|
|
| 9 |
(Formula) |
|
|
|
|
|
|
The above example's last column consolidation can also be replace by a formula.
The column design will then look as followed:
| |
A |
B |
C |
D |
E |
F |
G |
| 1 |
(Column
Description) |
|
Residence
A |
Residence
B |
Residence
C |
Residence
D |
TOTAL |
| 2 |
(Financial Field) |
|
A |
A |
A |
A |
F |
| 3 |
(Column Cost Centre/Consolidation) |
|
R100 |
R200 |
R300 |
R400 |
|
| 4 |
(Column Reporting Year) |
|
0 |
0 |
0 |
0 |
|
| 5 |
(Start and End Cycle) |
|
0-6 |
0-6 |
0-6 |
0-6 |
|
| 6 |
(Include/Exclude Cycle 13 and 14) |
|
13Ex, 14In |
13Ex, 14In |
13Ex, 14In |
13Ex, 14In |
|
| 7 |
(Type of Expense Budget) |
|
|
|
|
|
|
| 8 |
(Expense Budget List Code) |
|
|
|
|
|
|
| 9 |
(Formula) |
|
|
|
|
|
C1+C2+C3+C4 |
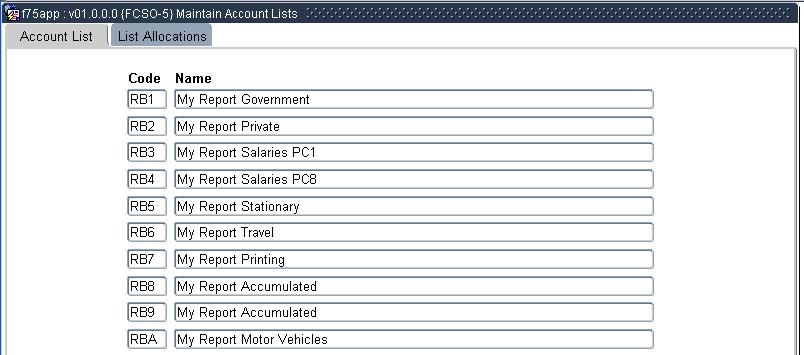
- Create/Maintain the Account lists for each row
In option {
FCSO-5}, TAB -
Account List, create
the account list code and
description. On block 2 you will link the account detail.
For the above example,
block 1 and 2 will look as follow:
Block 1
Block 2
| Code |
Account |
| RB1 |
5001 |
| RB1 |
5002 |
| RB1 |
5003 |
| RB2 |
5100 |
| RB2 |
5101 |
| RB3 |
0101 |
| RB3 |
0102 |
| RB3 |
0103 |
| RB3 |
0104 |
| RB4 |
0801 |
| RB4 |
0802 |
| RB5 |
3010 |
| RB5 |
3011
|
| RB6 |
3120 |
| RB7 |
3220 |
| RB7 |
3221 |
| RB7 |
3330 |
| RB8 |
7010 |
| RB8 |
7020 |
| RB8 |
7030 |
| RB9 |
8010 |
| RB9 |
8011 |
| RB9 |
8020 |
| RB9 |
8030 |
| RBA |
8040 |
Spreadsheet Step 4: The Account
List Information
On the spreadsheet column
E add the account list code(s) as created on
{
FCSO-5} for each row.
| |
A |
B |
C |
D |
E |
F |
| 1 |
(Column
Description) |
|
Technikon
Year
-2 |
Technikon
Year
-1 |
Technikon
current year |
Percentage
Change |
| 2 |
(Financial Field) |
|
A |
A |
A |
F |
| 3 |
(Column Cost Centre/Consolidation) |
|
9999 |
9999 |
9999 |
|
| 4 |
(Column Reporting Year) |
|
-2 |
-1 |
0 |
|
| 5 |
(Start and End Cycle) |
|
0-12 |
0-12 |
0-12 |
|
| 6 |
(Include/Exclude Cycle 13 and 14) |
|
13In, 14In |
13In, 14In |
13In, 14In |
|
| 7 |
(Type of Expense Budget) |
|
|
|
|
|
| 8 |
(Expense Budget List Code) |
|
|
|
|
|
| 9 |
(Formula) |
|
|
|
|
(C3-C2)/C3*100 |
| 10 |
TOTAL
REVENUE AND
EXPENSE |
|
Value
Row 12 and
17 |
|
RB1, RB2, RB3, RB4, RB5, RB6, RB7 |
|
| 11 |
|
|
|
|
|
|
| 12 |
Total
Income |
|
Value
Row 14 and 15 |
|
RB1, RB2 |
|
| 13 |
|
|
|
|
|
|
| 14 |
Government |
|
Acc 5001
5002, 5003 |
|
RB1 |
|
| 15 |
Private |
|
Acc
5100, 5101 |
|
RB2 |
|
| 16 |
|
|
|
|
|
|
| 17 |
Total
expense |
|
Value
Row 22 and
28 |
|
RB3, RB4, RB5, RB6, RB7 |
|
| 18 |
|
|
|
|
|
|
| 19 |
Salaries
PC1 |
|
Acc
0101, 0102, 0103,
0104 |
|
RB3 |
|
| 20 |
Salaries
PC8 |
|
Acc
0801,
0802 |
|
RB4 |
|
| 21 |
|
|
|
|
|
|
| 22 |
Total
Salaries |
|
Formula
R19+R20 |
|
|
|
| 23 |
|
|
|
|
|
|
| 24 |
Stationary |
|
Acc
3010,
3011 |
|
RB5 |
|
| 25 |
Travel |
|
Acc
3120 |
|
RB6
|
|
| 26 |
Printing |
|
Acc
3220, 3221,
3330 |
|
RB7 |
|
| 27 |
|
|
|
|
|
|
| 28 |
Total
Supplies and
Services |
|
Formula
R24+R25+R26 |
|
|
|
| 29 |
|
|
|
|
|
|
| 30 |
|
|
|
|
|
|
| 31 |
BALANCE
SHEET FOR THE
PERIOD |
|
|
|
|
|
| 32 |
|
|
|
|
|
|
| 33 |
Total
Funds |
|
Value
Line 35 and 36 |
|
RB1, RB2, RB3, RB4, RB5, RB6, RB7, RB8 |
|
| 34 |
|
|
|
|
|
|
| 35 |
Accumulated |
|
Acc
7010, 7020,
7030 |
|
RB8 |
|
| 36 |
Revenue
and
Expense |
|
Formula
R4 |
|
|
|
| 37 |
|
|
|
|
|
|
| 38 |
Total
Asset |
|
Value
line 40 and 41 |
|
RB9, RBA |
|
| 39 |
|
|
|
|
|
|
| 40 |
Furniture |
|
Acc
8010, 8011, 8020,
8030 |
|
RB9 |
|
| 41 |
Motor
Vehicles |
|
Acc
8040 |
|
RBA |
|
- Create/Maintain the Consolidation Cost Centre if
necessary.
If there is a need to
create or
maintain any
consolidation
cost centre structure, then the user must
do
it in option {
FCSO-1},
TAB - Consolidation
of Cost Centres.
In the second example
above of the column information, the
consolidation structure of consolidation cost
centre R999 must look
like the following in {
FCSO-1}, TAB
- Consolidation
of Cost Centres.
| Primary Cost Centre |
Secondary Cost Centre |
| R999 |
R100 |
| R999 |
R200 |
| R999 |
R300 |
| R999 |
R400 |
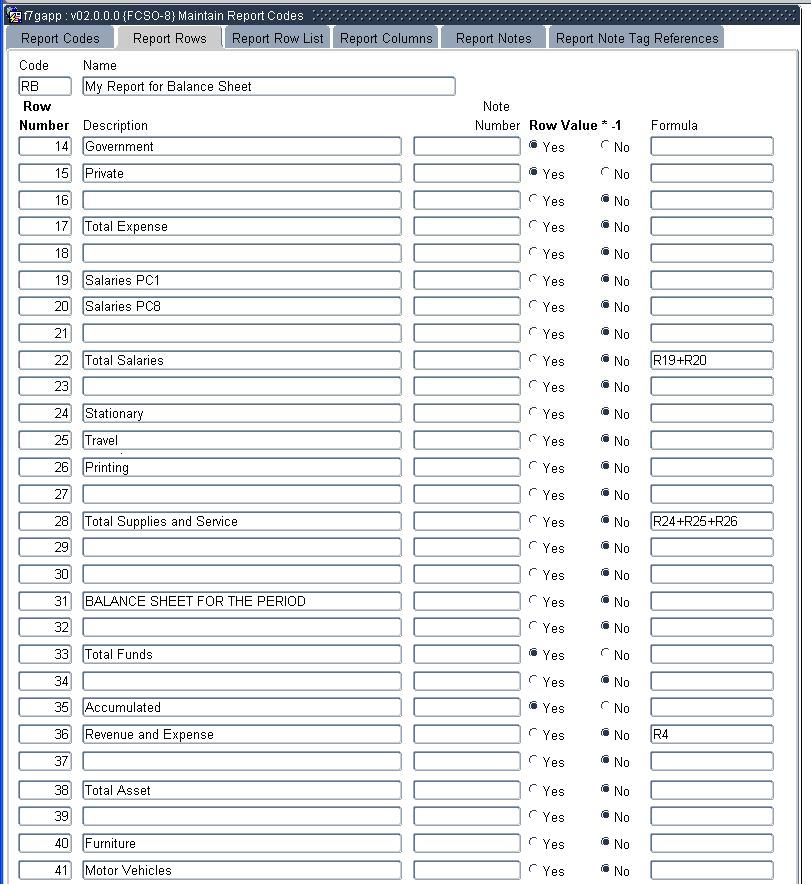
- Create/Maintain
the Report Body
Do the following in
option
{
FCSO-8}, Maintain Report
Codes, using the spreadsheet information.
Option {FCSO-8}, TAB - Report
Codes, Create
the Report Code
Option {FCSO-8}, TAB - Report
Codes: Report Rows, Create/Maintain the
row information
The field "Row Value *-1 tick boxes" can be
used to alter the "look" of a line item. Usually it would mean that
where the line item is an income (credit in the ledger) you will
indicate that it must be multiplied with -1 to ensure a "positive", if
ticked. Each tick box column will change different report column
financial field values. The first column is for report column
financial field Actual, the second Budget, the third Commitment and
lastly Expense Budget. Formula report column use the column value
as converted after the Row Column Value was multiply by minus 1.
We recommend that you
leave all the values as un-ticked. Once the report
is produced and if there are some
amounts that don't
display according
to preference then it can still be changed to ticked.
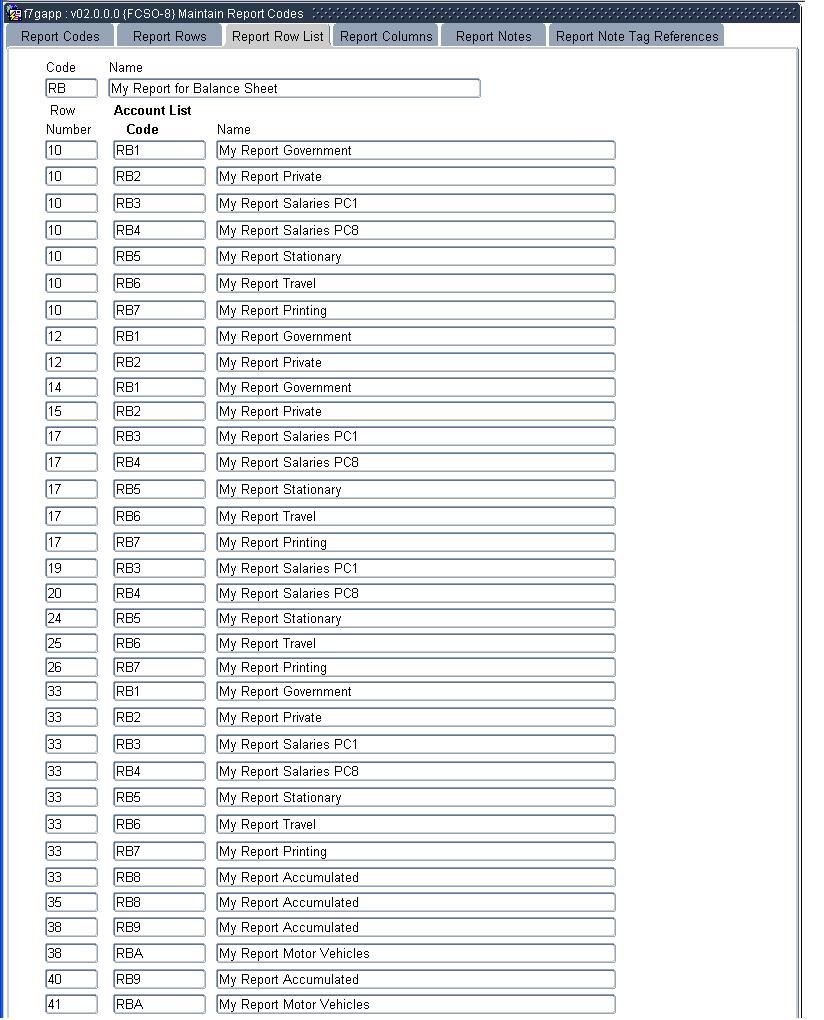
Option {FCSO-8}, TAB
- Report Row List, Link rows to
their account list.
Option {FCSO-8}, TAB
- Report Columns, Create/Maintain the
Column Information.
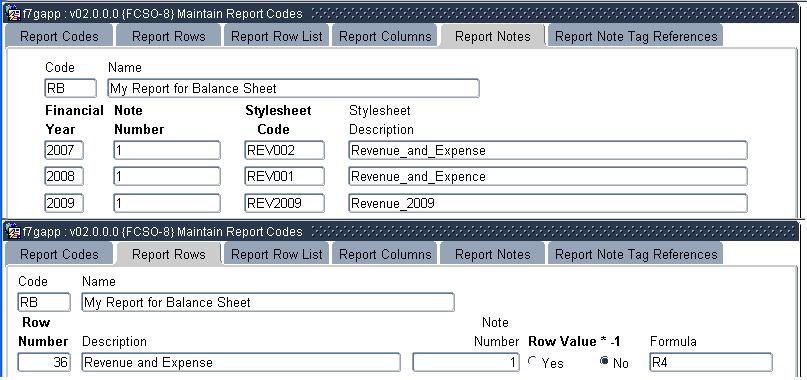
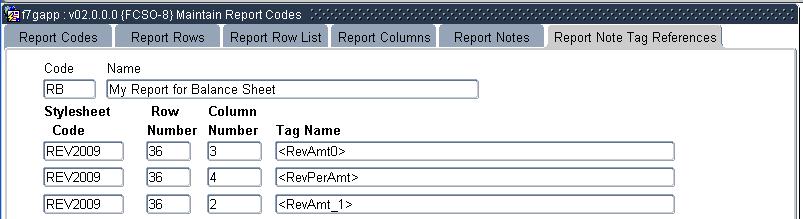
- Option {FCSO-8}, TAB
- Report Notes, Create/Maintain the Note Information and Option {FCSO-8}, TAB
- Report Notes Tags, Create/Maintain the Note Tag Information.
The User can also set-up
note information for a
specific GL Report Code and year and
link
the note information
to
the row.
How to create the note Style Sheet read manual of option {
GMNT-14}.
In short a note style sheet is create using the following steps:
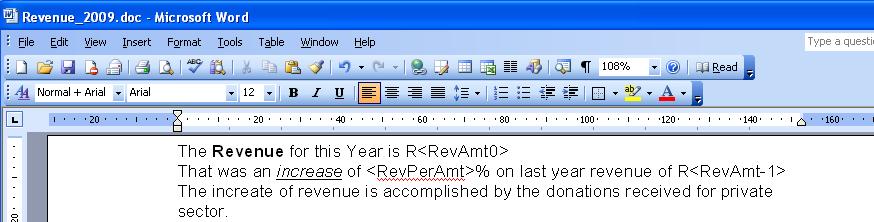
A) Create the note using word:
Note:
The user can choose the font, bold, etc.
The user defined tags <RevAmt0>, <RevPerAmt>
and <RevAmt-1>. See below how they are define in the
GL Report definition.
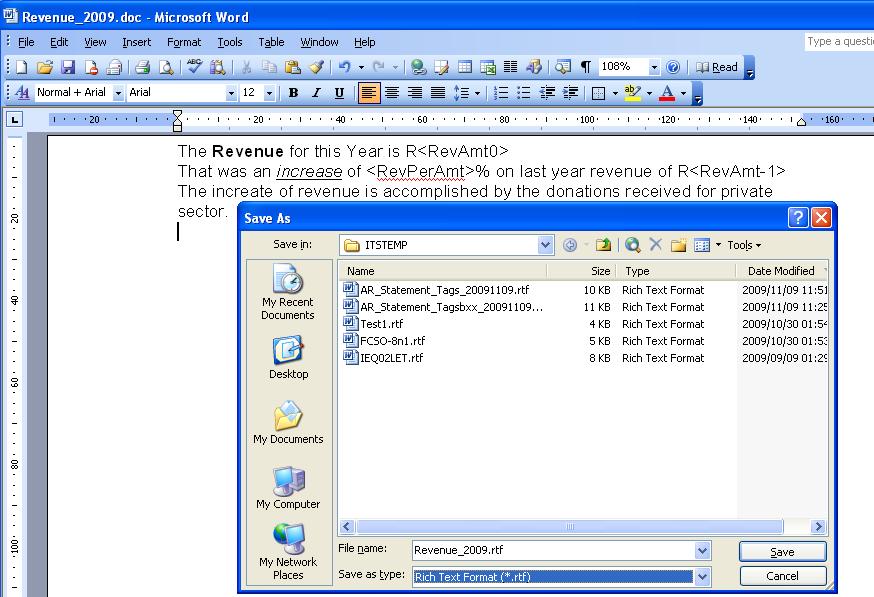
B) Save the file as a word document under your C: drive, directory ITSTEMP and as RTF file.
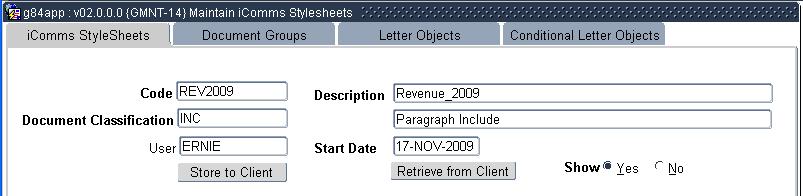
C) Create/Maintain Style Sheet in option option {
GMNT-14}
NB. The Document Classification must be "INC"
After creating the record click on the "Retrieve from Client" button to upload the Revenue_2009.rtf file.
D) Link the style sheet/s to the report code and the required row definition.
E) Create/Maintain the Report Note Tag References
The option will validate
for a specific
report code (as defined in {
FCSO-8}) on the following levels:
Phase 1 : Duplicate Account Numbers in the Account Lists
Phase 2 : Account Numbers not in the Account Lists of the Report Code
Phase 3 : Column Numbers Without a Budget Parameter List
Phase 4 : Column Numbers With Invalid Formulas
Phase 5 : Row Numbers With Invalid Formulas
Once the report
structure
has been set
up, the user can run the option "GL Report As Per Report
Structure". You can request for a report or a comma delimited
file that will allow you to have it as a spreadsheet.
This
report will ONLY select General Ledger information from the
General Ledger Table. Unposted information in the subsystems
will
NOT form part of this report.
The Selection Criteria
is
as follows:
| Enter Report Code |
A2 |
As define is option
{FCSO-8}, TAB - Report
Codes |
| Enter Calendar Year |
YYYY |
This year will
substitute the year 0 (zero) in option {FCSO-8b4} |
NB. Use the format F7N01CSV to Create Comma Delimited File.
View the file, then copy it to your spread sheet software.
8. Security of
ITS Financial Systems
Security of systems in
use
is, in the
first instance, the responsibility of the institution. ITS
supplies certain security measures with its Systems as an aid to its
clients.
The
UNIX/Oracle
environment within which all ITS Systems, including the
Financial System, operate, allows the usage of
five security control
levels:
- UNIX Username and Password
This level controls
access
into the
UNIX environment, and should be under the control of the Data
Processing Department who will grant access privileges to users as
instructed by management. Refer to Section 9 of the User
Manual
of the General System Support for more information in this
regard.
- Oracle Username and Password
This level controls
access
into the
Oracle environment, i.e. the menus of the ITS Systems, and should be
under the control of (at most) a few senior users who will also act on
management's instructions. Refer to Section 5 of the User
Manual
of the General System Support for more information in this
regard. Option {
GOPS-6}
allows the addition of new users, the
deletion or updating of old users, and the re-instatement of
users.
- Counter System
This level controls
input
and update of
certain menu options in the COUNTER SYSTEM. In option
{
FCTM-1},
systems administrators can De-/Activate the Counter System on several
levels. Option {
FCTM-2}
defines the Cashier ID's and
Passwords. These options should be under the control of one
or
two senior financial users. The Cashier can sign-on/-off and
change his/her password under option {
FCTO-1}/{
FCTO-2}.
- Account Categories
Subsystem Access This
level controls the
accounts used
in the different subsystems. Option {
FCSC-7}
defines this
control, and should be under the control of one or two senior financial
users.
- User Restrictions
Menu options
{
FCSM-1}/{
FCSM-4}/{
FCSM-5}/{
FCSM-6} are
designed to give users more control on data records in selected menu
options. E.g. an option gives the user access to data records
only where the cost centres are linked to a particular faculty or
department code.
- Finance Permissions
Menu options
{
FCSP-1} / {
FCSP-2} / {
FCSP-3} / {
FCSP-4} / {
FCSP-5} / {
FCSP-6} / {
FCSP-7}
are
define the area (cost centre, account and amount) in which a user can
create and maintian and aporve documents, journals and a r give
users more control on data records in selected menu
options.
| Date |
System Version |
By Whom |
Job |
Description |
| 07-May-2007 |
v01.0.0.0 |
Charlene van der Schyff |
t137175 |
New manual format. |
| 10-May-2007 |
v01.0.0.0 |
Amanda Nell |
t137175 |
Editing of document |
| 06-Mar-2009 |
v01.0.0.1 |
Ernie van den Berg |
t155140 |
Add options to the Implementation
Sequence |
| 16-Nov-2009 |
v01.0.0.2 |
Ernie van den Berg |
t163143 |
Add the GL Report Writer new enhancements in par. 7 |
| 18-Jan-2010 |
v01.0.0.3 |
Ernie van den Berg |
t164165 |
Add new column for Row * - 1 |
| 27-Sep-2011 |
v02.0.0.0 |
Christel van Staden |
t164302 |
Fix version |
18-Dec-2012
|
v02.0.0.1
|
Marchand Hildebrand
|
t183060
|
Add finance permissions
|
| 05-Dec-2016 |
V04.0.0.0 |
Ntshabele Morgan |
T208911 |
Removed any reference to discontinued "Investment" and "Long Term " Subsystems |